FIBER-OPTIC SENSING: Distributed fiber-optic sensing solves real-world problems
PIERRICK VULLIEZ
In June 2011, 4DSP officially licensed fiber-optic sensing technology from the National Aeronautics and Space Administration (NASA; Washington, DC) after collaborating with NASA since 2007. Representing a 20-fold improvement over existing sensing solutions, the fiber Bragg grating (FBG)-based technology solves real-world problems in structural and environmental monitoring in industries not only related to aerospace, but in areas as diverse as automotive, oil and gas, nuclear energy, medical devices, and wind energy.
Real-world problems
For liquid and gas storage, leakage is not an option. In the renewable energy industry, wind-turbine blade breaks are catastrophic. And regarding passenger safety in air travel, structural faults need to be found and addressed immediately.
All of these real-world problems are solved today using numerous, typically electronic-based sensors. Unfortunately, these sensors are often expensive, hard to distribute over a large physical structure, and easily prone to failure. A better alternative is FBG-based fiber-optic sensing. But first, a description of real-world problems gives an indication of how complex the sensing process may be and what parameters are important in each application.
Liquids and gases are stored all around us, safely waiting to be used in barbeques, bathtubs, brake cylinders, and much more. These storage tanks, often holding their contents under pressure, must maintain their structural integrity over a lifetime of use, as well as misuse, modifications, and unforeseen circumstances. This leads inevitably to overdesign, where materials are thicker, heavier, and costlier than required. The alternative is a modest reduction in safety margin coupled with a continuous monitoring of structural performance.
For liquid and gas storage systems, strain measurements gathered during prototype testing can be used to confirm or disprove the validity of the theoretical model used during design. In addition, trends seen in data gathered in real time throughout the lifetime of field operations can help determine the current structural health of the vessel. Crack initiation and propagation, corrosion, and localized overloading produce signatures that can be identified early, allowing operators to make repairs before significant damage occurs and extending product lifetimes.
In the renewable energy field, wind turbines have become mainstream. Installed in places where they can gather and convert the most energy, they are constantly subjected to changing weather conditions. The taller the wind turbine and the longer its blade span, the more wind it will be exposed to and the more energy it will produce. The downsides are a heavier structure and a complex maintenance scheme. Engineers have devised ways of designing stronger, lightweight materials, but the smallest imperfections during manufacturing or damage during operation can cause catastrophic failure of a blade.
While downtime may not be significant depending on the turbine design, repair costs can be. More accurately detecting damage during runtime and at the finest-resolution level offers benefits that translate into lower maintenance costs and the assurance of blade integrity. Blade geometry is carefully designed to maximize turbine efficiency, but the aerodynamic loads encountered during operation inevitably cause them to deflect, twist, and vibrate, leading to an altered aerodynamic response and decreased efficiency.
With real-time knowledge of turbine blade shape and vibrational behavior, it is possible to compensate for performance changes. Control schemes utilizing this information may be developed to autonomously adjust the blades to decrease deflections, or to dampen out individual vibrational frequencies. Therefore, the blades would see less deviation from their nominal and most efficient shape. Data taken over longer periods of time would aid in the development of future designs, improving the future of wind turbines in the mix of renewable energy products.
Finally, real-time sensing is a requirement to reduce the cost of air travel without jeopardizing passenger safety. Aerospace engineers and structural analysts use sophisticated software tools to aid in the design of modern aircraft. Using finite element analysis, these packages predict aerodynamic loads on an aircraft, and the stress and strain on every component of the structure. As designers create more complex airframes and choose more innovative materials, the difficulty of modeling and testing the airframe increases.
Traditionally, strain gauges are installed in a test aircraft to measure its mechanical performance at discrete locations. Hundreds of these electronic devices are installed throughout the structure and connected to an instrumentation system. This process is too cumbersome to scale up to the level of detail and scope needed to verify the flight loads on the more flexible, lightweight, and complex aircraft.
One of the major hurdles facing the aviation industry for years to come is to reduce cost without compromising safety. With nearly 40% of revenues spent on fuel alone, airlines and aircraft manufacturers alike are looking at novel ways to cut down consumption. An obvious target is the weight of the planes, as it is directly related to how much fuel they consume. Utilizing novel materials (like fiber-optic sensors) to reduce weight and maintenance will lead to a healthier airline industry.
A distributed fiber-optic sensing solution
The sensor installation process for aircraft and other structures such as gas storage tanks or wind-turbine blades is relatively straightforward, but labor-intensive. Resistive strain gages are the most common sensor type and are composed of a zigzag pattern of copper foil that is calibrated to produce voltage changes proportional to the pattern’s geometric expansion due to being glued onto the underlying material. Each sensor location is carefully prepared so that the bonded gage, when glued to the surface, fully measures the elongation of the substrate. Often, strain rosettes are installed—a triad of gauges oriented 120° from each other, each with a pair of sensor wires. This set of measurements provides a complete picture of the stress flow in the material, which is a combination of tensile stress in two directions as well as shear.
In the aerospace industry, the internal structure of an aircraft has hundreds of areas of interest for structural testing. Many of these areas have complex features, as well as stress concentration features such as fasteners. As a result, there is ambiguity in determining the best location for a strain gauge installation. Some structures are movable, such as flaps, doors, and landing gear. This requires careful bundling of hundreds of instrumentation wires.
Once the gauges have been attached and the lead wires have been bundled and routed, all of the signals must be connected to a centralized data collection system with an array of channels. With individual calibration constants, the sensing channel for each gauge must be adjusted in order to accurately measure strain, resulting in bundles of electrical wires that are running along the structure, occupying space and requiring regular maintenance to ensure that they really work.
True safety margin comes from an intelligent structural health monitoring system and requires real-time measurements in order to accurately understand and predict the system’s dynamic response to real-world factors. Fiber-optic sensing using FBGs offers the capability to multiplex thousands of sensors on a single fiber. Recent advances in signal processing techniques have also made it possible to monitor several fibers in parallel.
Sensor design and performance
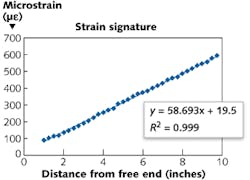
A fiber-optic cable, manufactured with embedded Bragg gratings, exhibits behavior that is proportional to its elongation. These types of sensors can be installed in various ways that couple mechanical strain, temperature, acceleration, or pressure to the elongation felt along the fiber using a central interrogation unit. Laser light, passing through the fiber, is used to measure the elongation. Since multiple gratings are easily written into a length of optical fiber, a single fiber-optic cable can contain thousands of sensors in series. These signals can be decoded simultaneously using optical frequency domain reflectometry (OFDR) techniques, producing accurate strain measurements down to 1 microstrain resolution and complete immunity to electromagnetic noise. The strain information can be used directly or be post-processed to obtain shape information, depending on the application.
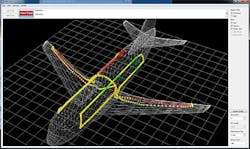
The sensor elements, located at equally spaced intervals along the fiber-optic cable, return wavelength-encoded information about their elongation at a particular location. In areas of particular interest, the fiber can be routed near stress-concentration features and through areas of maximum predicted stress (see Fig. 1). A single fiber can be installed with loops, creating strain rosettes of any orientation and location.
In situations demanding fine spatial resolution, the fiber can be made with one long continuous grating. This sensor type can be subsampled with virtual sensor elements producing accurate readings at any spacing desired. In addition, a small sleeve can insulate the fiber from the strain in the underlying surface, creating a temperature sensor in which the elongation of the Bragg grating is entirely due to thermal expansion of the glass fiber.
Each fiber can be individually configured for spatial resolution, sensor locations, and signal filtering. Fiber sensor installation can be performed with the same techniques used for traditional strain-gauge installation. After the surface is sanded rough and thoroughly cleaned, the fiber is tacked in place using small strips of low-residue polyester tape. A thin fillet of epoxy is applied along the fiber, wicking underneath and creating a strong bond. External surfaces can use tank sealant to protect the fiber and maintain a smooth surface. Further research is being conducted for embedding fibers directly in composite materials.
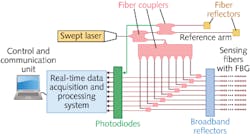
The RTS150 fiber-optic sensing system uses a tunable laser source capable of generating a narrow beam and sweeping between wavelengths in the range of 1525–1560 nm (see Fig. 2). A small portion of the laser light is input to a Michelson interferometer in order to generate a beat (or reference clock). The remainder of the coherent light is distributed through the sensing fibers and photodiodes are used to convert the light reflected back from the Bragg gratings into electrical signals. Analog-to-digital converters produce a stream of digitized samples that are fed to a signal processing unit made of gate array devices and abundant memory resources. The frequency analysis takes place in real time and strain data is made available to the control unit less than 50 ms after the measurements occur in the optical domain. In comparison, competing instruments deliver a rate of <10 Hz over a single fiber with a latency of several hundred milliseconds—not practical for applications where near-real-time command and control can affect the results of a sensing application.By supporting tens of thousands of sensors at rates of several hundred hertz and multiple fibers, instruments like the RTS150 simplify structural health monitoring, offering engineers a new realm of sensing in order to enhance safety and reduce cost across various industries.
PIERRICK VULLIEZ is founder and CTO at 4DSP, 1210 San Antonio St., Suite 801, Austin, TX 78701; email: [email protected]; www.4dsp.com.


