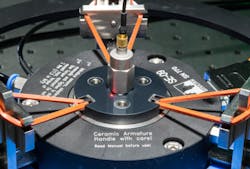
NIST to offer laser-interferometric calibration service for accelerometers
The National Institute of Standards and Technology (NIST; Gaithersburg, MD and Boulder, CO) is, of course, in the specialty of offering calibration services, many of them either related to or relying on optics and photonics -- for example, see this article posted last week: MAP-2 second-generation NIST program accurately characterizes lighting LEDs, and this from late last year: NIST launches new calibration service for high-power lasers up to 10 kW.
In the newest example, NIST at Gaithersburg, MD will in a few weeks begin offering a state-of-the-art calibration service for accelerometers. Based on laser interferometry, the system will have a sensitivity of a few nanometers and will be able to measure at frequencies up to 50 kHz.
In addition to providing motion-change information to smartphones, game controllers, and, in automobiles, airbag sensors, accelerometers have long been essential to the automotive and aerospace industries for identifying unwanted vibrations, to the military for inertial guidance of submarines and weapons systems, to seismologists who study the motion of the earth, and to facilities such as nuclear power plants to provide early warning that a piece of equipment is about to fail. In addition, combining inertial guidance with GPS can provide position locations in places where GPS signals cannot reach, such as inside buildings.
Calibrating accelerometers reveals how well they can measure the distance something moves (the “throw”) over a specific amount of time, how fast it can respond to that change, and whether its readings vary over time, among other considerations.
Shaker table + interferometric vibrometer
In NIST's facility, as in many others, measurements are made on a shaker table. For a typical accelerometer a few centimeters in length, a simple test run might take about 10 minutes to step the device from about 5 Hz with a throw of about 8 mm to 25 kHz (the facility's initial upper limit for calibration measurements), with a throw in the micrometers range.
The table's motion is continuously monitored by a downward-pointing beam from a laser-interferometric vibrometer, which is mounted on a heavy base plate above the shaker. The data are then compared to the output readings from the accelerometer under test over a span of approximately 1 to 100 m/s2. To measure the performance of accelerometers over much lower frequencies, which require longer throw distances, the NIST facility also contains two other instruments, mounted on a cubic meter of granite, that allow for motion over as much as 50 mm.
Although project researchers sometimes work collaboratively with manufacturers, the principal customers for the service will be calibration laboratories, many of which have contracts that call for NIST-traceable measurements, as well as large facilities such as nuclear plants that require periodic verification of sensors in safety systems.
NIST's project scientists use a custom version of a commercially available system used at the world's top metrology institutes. The new primary calibration system is custom made to stringent NIST-required specifications. At present, the researchers are finishing a complete suite of tests on the system, and will soon publish the uncertainty budget, which is an analysis listing all possible sources of uncertainty in different aspects of the measurements, and the relative magnitudes of each. So far, they have determined that the system performance exceeds the manufacturer's claimed specifications. This finding, subject to further testing, may enable NIST's calibration service to lower its uncertainties even further as in the future.
$15 billion world market today for accelerometers
"[Today's accelerometer] applications are driving high-volume sensor manufacturing, resulting in a $15 billion world market with a 13% compound annual growth rate," says Michael Gaitan, project leader in NIST's Nanoscale Metrology Group. "It is projected to grow to $22 billion by 2018. The testing and calibration requirements of these sensors are becoming more complex and demanding as more functions, such as gyroscope and compasses, are integrated together with the accelerometers. NIST is working together with the sensor-manufacturing industry to advance measurement technologies and standards to meet these needs."
Source: http://www.nist.gov/pml/div683/grp03/accelerometer-calibration-service.cfm

John Wallace | Senior Technical Editor (1998-2022)
John Wallace was with Laser Focus World for nearly 25 years, retiring in late June 2022. He obtained a bachelor's degree in mechanical engineering and physics at Rutgers University and a master's in optical engineering at the University of Rochester. Before becoming an editor, John worked as an engineer at RCA, Exxon, Eastman Kodak, and GCA Corporation.
