MATHIAS BEYERLEIN AND JOHANNES PFUND
The application of light has become hugely important in many diverse fields, including medicine, telecommunications, materials processing, and more recently in the production of consumer goods. For many of these applications, knowledge of the beam propagation characteristics of the light source, either in free space or through an optical system, is critical.
In practice, wavefront-measurement techniques can be used to characterize a laser beam or determine aberrations in an optical system (industrial or biological). Any technique must be able to measure across the whole wavefront with enough lateral detail to allow acceptable predictions to be made for continuing beam propagation, or for identifying the cause of wavefront distortion. Interferometric approaches have long been used for optics characterization (as is still the case for quality control of the optics components used in optical storage) and these methods do provide exceptional lateral resolution. Shack-Hartmann methods provide somewhat lower resolution, but are nonetheless becoming increasingly prevalent in industrial environments in which insensitivity to vibration, flexibility, and the ability to measure local wavefronts over a large dynamic range are important operational parameters.
Shack-Hartmann
The roots of contemporary Shack-Hartmann (SH) methods can be traced back more than 100 years to the original work carried out by J. Hartmann.1 The real enabler, however, for modern SH technology was the advent in 1971 of microlens arrays with a pitch smaller than 1 mm, coupled with the use of multipixel CCD detectors. These SH techniques then saw a major breakthrough with their application to adaptive-optics image-correction systems for very large telescopes.2
A Shack-Hartmann sensor divides up the incoming beam into sub-beams, dividing up the wavefront into separate facets, each focused by a microlens onto a subarray of CCD camera pixels. Depending upon where the focal spot from each facet strikes its subarray of pixels, it is then possible to determine the local wavefront inclination (or tilt). Subsequent analysis of all facets together leads to determination of the overall wavefront form.
Any predetermined wavefront later modified by reflection or transmission can then be analyzed, and the information used to determine the surface shape or the transmissive optical quality, respectively, of the optical component responsible for the wavefront change. Critical aspects of sensor design include having sufficient resolution over the whole wavefront for the application in mind and simultaneously providing enough CCD pixels per facet to accurately determine the spot “center of mass” and the local inclination of the wavefront. Once these resolution issues have been decided, the overall range of measurable wavefront distortion is then a question of balancing sensor geometry against diffraction issues.
One traditional weakness of SH sensors is crosstalk on the CCD array—sufficiently distorted (local) wavefronts can result in the associated spot straying outside of its own pixel subarray into another on the CCD. But today, crosstalk errors can be suppressed either by tracking or accurately inferring the true spot location through the use of sophisticated algorithms. Software developments, together with continuing improvements in CCD camera systems, image processing electronics, and micro-optical components, have driven the performance of SH sensors to new levels.
Extreme wavefront distortion measurement
A major advantage of SH sensors is their ability to measure a large range of local wavefront inclinations—a level of wavefront distortion not normally accessible, for example, when using interferometric methods. Shack-Hartmann sensors can thus be used to distinguish aberrations in laser-beam profiles in situations in which the beam is not collimated. Here, the beam wavefront is measured directly, providing comprehensive data for beam propagation and divergence, and allowing laser manufacturers to quickly pinpoint and correct errors within the laser cavity or in the beam path.
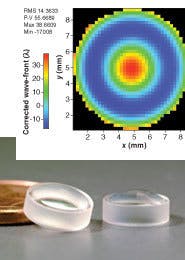
One industrial market in which SH methods are playing this role is characterization of the optical systems that go into camera phones. Such optical systems are based on easy-to-manufacture lens designs (often using aspheric surfaces) whose individual optical performance might be quite poor—individual lenses can show considerable wavefront distortion in transmission (see Fig. 1).3 Even so, the complete optical system might comprise three separate lenses whose various distortions are chosen to complement each other optically, resulting in minimal distortion overall (normally less than 0.25 wavelengths peak-to-valley across the usable aperture).
While the consumer market demands increasingly better field of view coupled with higher resolution and higher optical performance, manufacturers are striving to keep costs down. Rapid and flexible quality control of atypical optical components with SH sensors helps manufacturers do exactly this, while still being able to offer the consumer steady performance improvements.
Spherical and aspherical lenses are generally mass-produced, and in much smaller sizes, as complete assembled arrays of essentially identical lenses. Such arrays can be found in fiberoptic transmission systems, but can also be used for beam homogenization in UV lithographic techniques, and of course in SH sensors. In many instances these lenses need to undergo 100% quality control and thorough characterization.
While different interferometric methods can measure the surface profile by reflection, or the wavefront distortion in transmission, processing speed and the ability to deal flexibly with a range of optics/surfaces can be limiting factors. For example, individual aspheric lens surfaces can be notoriously difficult to characterize, as their more extreme surface shape hampers the reflection measurement. But SH sensors are capable of providing transmission and reflection data in a much shorter timeframe, making 100% quality control more financially viable. They are also better able to cope with different geometries, including asymmetric (cylindrical) lens shapes.
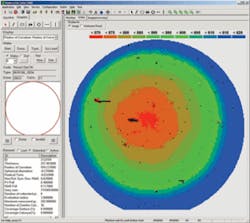
In a typical example of the use of SH sensors, a distribution of surface curvature for more than 38,000 microlenses on a wafer can be plotted using a pseudo color map in which each color corresponds to the best spherical fit to the aspheric surface (see Fig. 2). Using this data, specific areas on the wafer can be earmarked for particular lens characteristics. In addition, unexpected variation or sudden changes in this distribution can be used to optimize or identify errors in the manufacturing process.Ophthalmic and ocular diagnostics
The SH approach has become an established tool for ocular diagnostics, routinely used to measure eye dysfunction, either for the determination of relatively simple corrective optics, or as a precursor to laser-based corrective surgery techniques such as laser-assisted in situ keratomileusis (LASIK).
Shack-Hartmann sensors are also being applied to ophthalmic diagnostics, for example, to assess performance of the intraocular lenses (IOL) placed under the cornea. These IOLs are often implanted after an operation to remove a human lens disfigured by cataract, or to correct poor focal performance when LASIK is not an option (such as when sufficient material cannot be removed from the cornea because it is too thin). The IOL functions as a direct replacement for the original lens, available either with a fixed focus (to allow good vision at distance and requiring the use of glasses for reading) or with a flexible focus (retaining the usual accommodation capabilities of the eye and enabling simultaneous focusing at several distances).
More important, IOLs are being increasingly designed with aspherical, bifocal, or even toroidal surfaces. Fortunately, SH sensors are well suited for characterizing these types of lenses—notably in an air environment as opposed to the salt solution typical of the environment in the eye (under the cornea and where the refractive power of the lens is considerably reduced).
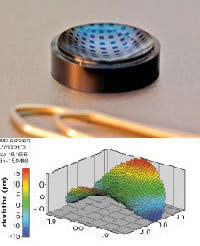
Contact lenses represent another application that can benefit from SH sensor technology. Contact lenses remain in position by adhering effectively to the cornea. Surface tension of moisture on the cornea draws the lens firmly into place and there is a continuous meniscus of moisture under the lens. In some cases, a more extreme cornea outer surface (of the type often responsible for astigmatism, but also those caused by more severe vision dysfunction) can prevent this from happening, and the corresponding inner surface of the contact lens then needs to be redesigned. In this application, SH sensors can be used to determine the accuracy of a preproduction toroidal lens designed to correct this problem (see Fig. 3).The broad range over which wavefront inclination can be measured means that SH technology is becoming increasingly popular for applications where measurement convenience carries more weight than the absolute resolution provided by interferometric methods. With increasing demand for diverse and specific optical solutions in rapidly growing consumer markets, SH sensor technology represents a vital economic and technical tool for many areas of optical manufacturing.
REFERENCES
1. J. Hartmann, “Objektivuntersuchungen,” Zeitschrift für Instrumentenkunde 24, 1 (1904).
2. J.W. Hardy, Adaptive Optics for Astronomical Telescopes, Oxford series in optical and imaging sciences, Oxford University Press, New York, NY (1998).
3. R.E. Fischer and D. Hileman, SPIE’s oeMagazine, 25 (April 2004).
Mathias Beyerlein and Johannes Pfund are joint managing directors at Optocraft, Am Weichselgarten 7, 91058 Erlangen, Germany; e-mail: [email protected]; www.optocraft.de.


