OPTICAL SURFACE INSPECTION: Structured-light 3D scanner speeds aircraft rivet inspection
A typical commercial aircraft is held together by several hundreds of thousands of rivets—or “fasteners,” as they are called in aerospace industry jargon—that can result in significant safety and fuel-efficiency issues if improperly installed. Ensuring proper fastener insertion while maintaining high levels of manufacturing efficiency has been a constant balancing act when using traditional inspection techniques. Recent innovations in structured-light 3D optical scanning and augmented reality (AR) techniques from 8tree (Denver, CO and Daisendorf, Germany)—the 2013 SPIE Startup Challenge winner—are making it possible to achieve both proper fastener insertion and efficiency.1
How it works
fastCHECK is an application-specific, 3D-structured light scanner optimized to measure fastener flushness with high speed and accuracy and consistent repeatability. The system consists of a solid-state, WVGA-resolution, MEMS-based light engine and a VGA-resolution, 125 frames/s CCD sensor coupled with supporting electronics and proprietary measurement and analysis software.
The light engine projects structured light patterns (variable-width fringes) onto the target aircraft surface and the reflections are detected by the sensor. Using well-established triangulation techniques, 8tree’s software performs a combination of 2D imaging to detect the exact physical location of a fastener combined with 3D image analysis of the reflected image to determine depth of the fasteners on the aircraft surface with a scan-acquisition time of approximately 100 ms. Operators can perform a one-time parameter adjustment specific to their task that will impact measurement results, such as fastener diameter and tolerances. After the few seconds required to set these parameters, the operator’s involvement is simplified to pushing a single button.
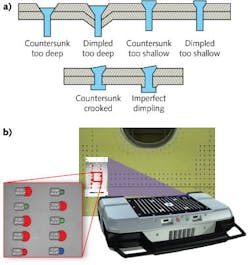
Integrated into the system is a patent-pending AR technique that projects the analyzed results of the scan back onto the target surface in the form of color codes and detailed dimensional and angular data annotations (see figure). This real-time AR technique eliminates the standard and repetitive process of looking up scan data on a computer terminal and interpreting it “offline” and instead allows users to perform “inline” measurements.
By abstracting the complex and time-consuming task of interpreting 3D scan data away from the operator and overlaying color-coded “pass-fail” images directly on the scanned surface, the system significantly boosts manufacturing and inspection efficiency. The light engine serves double duty by first projecting fringe patterns to enable scanning and then subsequently displaying the measurement results to create the AR image on the surface of the aircraft.
Early industry benchmarking shows that fastCHECK can scan, analyze, and deliver actionable information at a rate of greater than 1 fastener/second with repeatability and reproducibility (R&R) that sits below the 10% threshold of analysis of variance (ANOVA) gauge R&R measurement system analysis studies while maintaining 25 μm accuracy and 5 μm resolution for an 18 × 24 cm field of view. The total time for scan, measurement analysis, and visual overlay of results is less than two seconds.
In-process inspection
Fastener-flushness inspection is usually completed after fastener insertion and typically as part of the quality assurance phase of the workflow. But fastCHECK combines scanning, analysis and AR visualization with the potential for real-time inspection and on-the-spot rework.
“Against the backdrop of manual tactile inspection methods that require operators to remain actively ‘hands-on’ at all times, the industry has gained a great deal with the adoption of optical scanning systems, which have reduced a user’s active involvement during measurement to dozens of mouse-clicks,” says 8tree cofounder Arun Chhabra. “Taking this a step further, by pursuing a highly targeted application focus and incorporating AR techniques using fastCHECK, the user-interaction can be reduced further to a single-button-push. And our next-generation system aims to build on current performance by incorporating gesture recognition, thereby simplifying the user-experience to a natural ‘no-click’ environment.”
Chhabra says 8tree’s fastCHECK product is currently undergoing extensive evaluation by the aerospace industry and is scheduled to be introduced in the manufacturing workflow soon.
REFERENCE
1. See http://spie.org/x88933.xml.

Gail Overton | Senior Editor (2004-2020)
Gail has more than 30 years of engineering, marketing, product management, and editorial experience in the photonics and optical communications industry. Before joining the staff at Laser Focus World in 2004, she held many product management and product marketing roles in the fiber-optics industry, most notably at Hughes (El Segundo, CA), GTE Labs (Waltham, MA), Corning (Corning, NY), Photon Kinetics (Beaverton, OR), and Newport Corporation (Irvine, CA). During her marketing career, Gail published articles in WDM Solutions and Sensors magazine and traveled internationally to conduct product and sales training. Gail received her BS degree in physics, with an emphasis in optics, from San Diego State University in San Diego, CA in May 1986.
