Optics Characterization: Shack-Hartmann wavefront sensor enables flexible characterization of lenses
RALF DORN and JOHANNES PFUND
Many devices in today's market make use of optics; in particular, aspherical elements are on the rise because they allow optical systems to be designed more compactly and easily. Although functional and quality demands on optics are continuously increasing, maintaining quality of optics often lags behind because of the lack of sufficiently flexible measurement technology. Here, the use of a Shack-Hartmann wavefront sensor provides a solution, enabling a rapid and flexible recording of the characteristic values of optical lenses. A great number of different measurement processes and modalities can be integrated into one device so that it works efficiently both in manual and automated production environments.
There are several methods available to test an optical device. The simplest (and at the same time also the slowest) is to sample the optics using tactile methods such as stylus-based surface profilometry. However, optics can be damaged by tactile methods and the measuring device quickly approaches its limits for cases of high curvature.
In contrast, a Shack-Hartmann wavefront sensor assesses optics quickly using current computer power, and can operate using low-coherence light sources. The Shack-Hartmann sensor has a very high dynamic measurement range and functions rapidly enough that the measurement process is insensitive to environmental vibrations, and as a result is suitable for use in the vicinity of operating machines.
Sensor configuration
A Shack-Hartmann wavefront sensor consists of a 2D array of microlenses and a CCD camera detector. After passing through the microlens field, a flat wavefront generates a regular grid of points on the detector whose spots have the same array separation distance as the microlenses. If the wavefront has a curvature, the spots generated by the microlens are displaced in x and y correspondingly. From the shifts of these grid points, the wavefront can be reconstructed. With strongly curved wavefronts, however, the spots in the proximity of adjacent spots can move out of their "home aperture," or the immediate region surrounding the reference point's location.
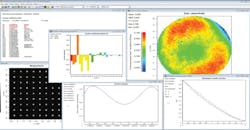
Optocraft has developed a Shack-Hartmann wavefront-sensing system (SHSLab) that contains a solution to this problem—a process that reliably assigns the displaced spots to their proper reference points in the case of high wavefront curvatures (see Fig. 2). The process requires only a single camera image and is thus very fast and simple to use. The local radius of curvature of a wavefront impinging on the microlens array can be as small as 5 mm, allowing wavefronts with extreme curvatures to be measured.The sensor (SHSCam) can accommodate up to 240 × 160 spots as well as an evaluation rate of up to 1000 Hz. By means of associated software (SHSWorks), a great number of optical measurement variables can be tested, such as wavefront aberrations, imaging quality (Strehl, MTF, etc.), focal length, and laser quality.
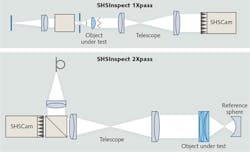
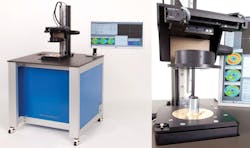
One of the complete measurement systems based around SHSLab is called SHSInspect (see Fig. 3). The system has two configurations: with "1Xpass," the measurement beam runs through the test specimens only once, while with "2Xpass," the light passes twice through the test specimen (see Fig. 1). In the latter case, the light is reflected back after the first transition of a mirror.One strength of 2Xpass is that its influence on the measurement beam is doubled because of the twofold transition through the test specimen. The resulting increase in measurement sensitivity allows the whole measurement configuration to be calibrated simply by means of a plane mirror and a reference sphere.
Integration into R&D and production environments
For the optical industry, this type of system offers high accuracy and can also be easily integrated into an automated production environment. One important characteristic is that the system works fast enough to measure in real time during the production cycle. The 1Xpass and 2Xpass systems reach, according to sensor size, frame rates between 1 and 50 Hz and, in special applications, up to 1000 Hz. Ultimately, the time required for the insertion of the test specimen into the measuring equipment determines the measuring rate.
Production environments naturally vibrate, induced by running machines or motors in the device itself. The high vibration tolerance of the Shack-Hartmann sensor system allows the expense of vibration damping to be avoided. A further important requirement for production quality control is a sufficiently high level of measurement precision. The Shack-Hartmann sensor head by itself achieves a typical uncalibrated base accuracy of λ/15 peak-to-valley (PV). Depending on the optical structure of the test system, an even higher precision can be achieved by suitable calibration measures. In the case of the 2Xpass, a value of λ/20 PV is about typical.
For testing of chromatic effects, a single wavefront sensor can be used over a wide wavelength range. The basic optical principle of the Shack-Hartmann sensor makes it possible to use the sensor not only with light sources of different wavelengths, but also with sources having low coherence. As a result, low-cost LEDs can be used as a source that provides a large range of wavelengths for testing.
Multifunctional systems
SHSInspect (especially in its 2Xpass form) is adaptable to the requirements of the user. Currently, on-axis and off-axis measurements with field angles up to 50° are possible. Larger angles are feasible. By measuring the mechanical and optical characteristics of a lens, both the back focal length (BFL) and the effective focal length (EFL) can be determined.
Many objective lenses include an adjustable lens provided at a location that can be targeted, displaced, and/or tilted, for example, to compensate form and position faults of the other fixed-assembly lenses. With the 2Xpass, the adjustment of such sliding lenses in microscope lenses is done rapidly, enabled by the motorized centering function of the return sphere to automatically adjust the return sphere to its ideal position. This allows the operator to concentrate on the adjustments of the test specimen.
In production, measurements can be implemented partly or fully automatically. In the first case, the test specimen is inserted manually into the measuring system-the measurements then progress automatically in accordance with a test protocol. However, this loading and unloading can also be implemented by means of a robot.
Because of their speed and the reliability of their measurements, Shack-Hartmann wavefront sensors are suitable for the testing of optics both in research and in production. Even wavefronts with extreme curvatures can be measured precisely using corresponding evaluation software in combination with special sensor models. However, to select the proper sensor configuration, it is important to first evaluate the required measurement sensitivity, as well as the requirements for integration into the production environment.
Ralf Dorn and Johannes Pfund are at Optocraft GmbH, Erlangen, Germany; e-mails: [email protected] and [email protected]; www.optocraft.de.


