Terahertz reflectometry nondestructively inspects foil seals

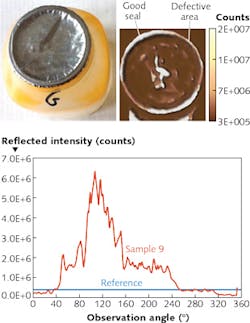
Foil seals such as aluminum-to-plastic or aluminum-to-glass cap closures are impossible to visually inspect because of the opacity of the metal seal, yet are extremely important to assure the integrity of the contents—such as pharmaceutical products. A nondestructive and noncontact terahertz scanner, however, from Applied Research & Photonics (ARP; Harrisburg, PA) can perform the inspection with high specificity and accuracy while providing both tabular/graphical data as well as visual data to readily identify the physical location of seal failure. This enables inline workflow assembly and sealing processes to be corrected in near-real time.
The terahertz scanner system illuminates a sample mounted on a rotary stage with a 10 mW dendrimer dipole excitation (DDE)-based terahertz source and analyzes the reflected signal level as the object is rotated. Because reflectivity is proportional to the distance between the surface under test and the detector, any raised foil regions are seen as a reflectivity increase in the tabular data compared to a reference scan that translates to a higher intensity in the visual analysis. Because delaminations and wrinkles are on the order of microns for this application, the 25 nm hardware sensitivity of the terahertz scanner readily identifies defective areas. Shorter-wavelength, visible, or infrared lasers cannot provide the higher sensitivity required for nanometer-level reflectivity data. ARP's DDE source produces a wide range of frequencies from approximately 0.1 to 30 THz, and uses a nanopositioning system and also a "molecular filtering" mechanism that allows detection of reflected terahertz intensity from a small feature area on the sample. Rapid rasterization then enables probing of 200 × 200 mm areas at standoff distances up to 6 in. at a rate of 7 mm/s. Reference: http://bit.ly/1HMEhze.
About the Author

Gail Overton
Senior Editor (2004-2020)
Gail has more than 30 years of engineering, marketing, product management, and editorial experience in the photonics and optical communications industry. Before joining the staff at Laser Focus World in 2004, she held many product management and product marketing roles in the fiber-optics industry, most notably at Hughes (El Segundo, CA), GTE Labs (Waltham, MA), Corning (Corning, NY), Photon Kinetics (Beaverton, OR), and Newport Corporation (Irvine, CA). During her marketing career, Gail published articles in WDM Solutions and Sensors magazine and traveled internationally to conduct product and sales training. Gail received her BS degree in physics, with an emphasis in optics, from San Diego State University in San Diego, CA in May 1986.