Machine Vision: Improved optical-inspection algorithm finds defects on industrial steel rollers

Large, precision-ground steel rollers are used in metalworking industries to create metal sheets and foils. The rollers are precision-ground because any surface defect would get repeatedly formed into the metal foil being fabricated. In fact, after a certain period of use, the steel rollers must be reground to return them to pristine condition.
Inspecting these rollers for surface flaws has traditionally fallen to quality-control assessors, who check the surfaces using their own eyes aided only by choosing advantageous illumination conditions and viewing angles. The result is inconsistent vetting of roller surfaces.
Researchers from Tsinghua University, the State Key Lab of Tribology, and the Beijing Key Lab of Precision/Ultra-precision Manufacturing Equipment and Control (all in Beijing, China) and Hiecise Precision Equipment (Suzhou, China) have developed a machine-vision system, including optics, mechanics, and software, to accurately measure roller surface defects, including dimensional error, form accuracy, chatter marks, surface roughness, speckles, surface/subsurface cracks, and others.1 The researchers say that the chosen software algorithm aids in identifying defects with fuzzy boundaries, intensity inhomogeneity, and complex background textures.
Improved ACM algorithm
First, the researchers took small roller sections and examined them with a scanning electron microscope (SEM) and a white-light interferometer (WLI) made by Zygo (Berwyn, PA), hoping to correlate the measurements with results found by human vision. There was not always a correlation—for example, speckles found by the naked eye were not found via the instruments. It was also found that the steel roller defects have features ranging from the micrometer to the centimeter scales.
To try to mitigate these problems, the researchers came up with an improved version of an active contour model (ACM) algorithm, along with a so-called split Bregman and Gauss-Seidel iteration method to speed up the algorithm. The new algorithm avoids problems seen in other algorithmic approaches, as described in detail in the researchers’ report.
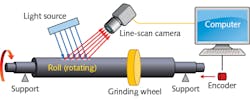
The machine-vision inspecting system itself includes a blue linear light source, a line-scan camera, and an encoder (along with the computer and software). Blue light was chosen because of its shorter wavelength, which better highlights defects through deflection and scatter.
The light is projected onto the roller surface in the axial direction, aimed at an angle toward the roller, and reflected off the roller toward the camera (see figure). The roller is rotated (with an encoder precisely monitoring rotational position of the roller) as the line-scan camera obtains its one-dimensional scans, thus building up a 2D defect map. Data was taken at 30 kHz as the roller was rotated at 40 rpm, and the resulting images were processed using MATLAB.
A machine-vision system for accurately finding defects on large industrial steel rollers includes a source of blue light, a line-scan camera, and a computer. The position of the roller as it is turned is measured by an encoder to coordinate roller orientation with the camera scans. The reason why it all works so well resides in the improved defect-finding algorithm.
The improved ACM algorithm was compared to conventional defect-finding algorithms, including the Chan-Vese, local binary fitting (LBF), and globally signed region pressure force (GSRPF) models. In comparison to the new algorithm, the Chan-Vese model converged onto local rather than global minima and thus did not entirely identify defects (and was least accurate of all the algorithms); the LBF model showed serious deviations from what was expected, being overly sensitive to local texture features (so that a few widely scattered small defects were overcharacterized); and the GSRPF model showed better performance, but still had problems.
An additional advantage of the newly developed algorithm was that it (along with the very inaccurate Chan-Vese model) took the least computer time to complete.
REFERENCE
1. J. Yang et al., Appl. Opt. (Apr. 1, 2018); https://doi.org/10.1364/ao.57.002490.

John Wallace | Senior Technical Editor (1998-2022)
John Wallace was with Laser Focus World for nearly 25 years, retiring in late June 2022. He obtained a bachelor's degree in mechanical engineering and physics at Rutgers University and a master's in optical engineering at the University of Rochester. Before becoming an editor, John worked as an engineer at RCA, Exxon, Eastman Kodak, and GCA Corporation.