SHARK Project closing and digital demonstration
We’ve come a long way since, in 2018, Sensofar joined the SHARK EU Project (supported by funding from the European Union’s Horizon 2020 Framework Programme for research and innovation under grant agreement no. 768701) as a consortium member, and now are reaching the end of the project.
The purpose of this project was to demonstrate that it is possible to industrialize laser functional texture without any specific added coating.
In all this time, the 11 consortium partners across Europe (3 research organizations, 4 technology providers & 5 market leading end users) worked together putting all our knowledge and experience within the reach of the group, thus enriching each of the processes within the full cycle.
In this case, specifically Sensofar, has provided all its experience in the field of metrology for these new texture techniques that are been developed in the project, thus showing the importance of incorporating optical surface metrology into current production processes.
Sensofar’s responsibilities were divided into 4 main areas :
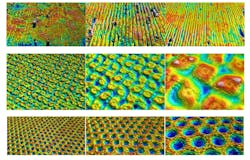
The first area was the study of textures and a system proposal:In the SHARK project, sensor size and measurement time were constraints for in situ characterization of the surface. A sum of 49 different textures from all end-user cases was characterized and the best measurement technology was identified for them. For such demanding applications, Sensofar also developed a high-speed sensor in which the basic technology was interferometry, specifically CSI. Here we adapted one of the products in our portfolio, S onix.
The second area was the online integration of the proposed system:The Sensofar development team involved in this project successfully redesigned a commercial sensor head to miniaturize it in order to be integrated into the laser processing machine. Once again, Sensofar demonstrated its capacity and competitive advantage to adapt to the needs that the client or the solution requires.
Fig.4 Comparison of current interferometer head to the prototype developed (left). Dual light source for high-speed CSI (right).
The third area was dedicated to the maximization and optimization of algorithms to guarantee the speed and the rest of the required specificationsDue to the increase of data amount and data rate, Coherence Scanning Interferometry (CSI) algorithms have been implemented in the GPU thus maximizing data processing throughput, achieving real-time processing. A new and compact Z scanner was also implemented together with the integration of two specific light sources to guarantee the best performance of the other optical technologies provided: Focus Variation and Confocal.
And finally, the integration of the optical system with the laser system to work simultaneously and demonstrate the capacity and feasibility.In this project phase, an optomechanical variation was implemented to adapt the sensor head optical path to focus a laser beam into the sample with the appropriate optics to the desired laser wavelength.
Fig.5 Hybrid head prototype and topography & vertical profile around the hole produced by the laser
To date, the project has been tremendously successful and has managed to demonstrate significant functionality performance on the case studies investigated (you can find an example here: “The influence of femtosecond laser produced periodic surface textures on cutting tool friction “)
Our satisfaction with the possibility of integrating processes in a production cycle of these characteristics and with such complexity has been demonstrated, which has undoubtedly been the best part of the project. It has been shown that by uniting skills and sharing knowledge, the sky is the limit.
If we have aroused your curiosity about the design and industrialization of surface engineering, or if you want to know more, we have organized a presentation and demonstration event of everything that has been achieved in the SHARK project.
Join us for this exciting half day digital event: “SHARK Digital Demonstration Day” on the 25th February 2021
To know more about the SHARK Project closing and digital demonstration:
The webinar will be showcasing the technological advancement and the industrialization exploration journey to unveil the mystery of surface engineering.
About Sensofar
Sensofar-Tech, SL (marketed name Sensofar Metrology) is a leading-edge technology company that has the highest quality standards within the field of surface metrology. Sensofar Metrology provides high-accuracy non-contact 3D surface metrology systems based on confocal, interferometry and focus variation techniques.
The product portfolio includes standard setups for R&D and quality inspection laboratories and compact inline non-contact metrology solutions for production processes. Sensofar Metrology offers technology that enables our customers to achieve real breakthroughs, particularly in the semiconductor, precision optics, data storage, display devices, thick and thin film and material testing technology fields.
Sensofar Group headquarters is located close to Barcelona, also known as a technology and innovation hub in Europe. The Group is represented in over 30 countries through a global network of partners and has its own offices in Asia, the United States and Germany.

