Nondestructive measurement method garners award
MARKUS KOGEL-HOLLACHER
Among the finalists at the recent Innovation Award Laser Technology—awarded by Arbeitskreis Lasertechnik e.V. (Laser Technology Study Group) and the European Laser Institute (ELI), and held during the International Laser Technology Congress AKL'14—was Precitec Optronik GmbH. The company was awarded second place for their "Measurement of welding depth and topology in laser material processing using low coherence interferometry" development. Dr. Markus Kogel-Hollacher and his colleagues at Precitec have described the process for ILS.
The use of laser light as a material processing tool has tightened the requirements for quality assurance. Laser welding in particular is governed by strict quality specifications for qualifying the robustness and durability of welding seams. One of the key parameters is the welding depth, which indicates the depth to which the material is fused during the joining process. Consequently, the penetration depth into the lower joining part can be specified based on the component configuration. Until now, there have been no nondestructive testing methods for determining this parameter during processing.
Currently, numerous methods are based on visual measurements in the welding region or in adjacent zones. Cameras can be used to capture the weld pool geometry or the aperture in the vapor capillary, also known as keyhole, through which the laser beam penetrates the component. The radiation emitted from the process is captured via photodiodes and compared to the target values. Both methods are able to detect variances in the process. However, the determined values have no direct reference to the welding depth. They merely indicate potential connection errors or process fluctuations.
The measuring system has to satisfy three fundamental requirements for use in industrial applications. It must be arranged coaxial to the processing laser to determine the depth of the keyhole and, hence, the approximate welding depth. In addition, high measurement resolution and accuracy are required alongside a measuring range of just a few millimeters. Finally, the measuring system must have an extremely high sampling rate to be able to withstand the dynamic of the keyhole during the welding process. The method known as "low coherence interferometry" satisfies this requirement. It is based on evaluating optical interferences that are directly related to the measured distance.
Precitec (www.precitec.com; Gaggenau, Germany) has many years' experience in the process monitoring sector, and also in developing optical measuring systems (FIGURE 1). The first in-process tests during remote laser welding had been conducted by early 2007. Regardless of the standoff distance and despite colossal process emissions, a stable distance signal was obtained. At first, the welding depth was determined by aligning the spot to be measured in the keyhole. In the years that followed, the technology was refined in various applications and collaborations. Besides laser cutting, welding, and structuring, Precitec assessed the suitability of the measuring system for other material processing applications using high-performance lasers.
In 2013, the collated results and experience gained culminated in the company's In-process Depth Meter (IDM), the product that integrates welding depth measurement into commercially available laser processing machines. This system consists of a slim opto-mechanical unit mounted to the processing head and an evaluation platform. The latter is based on tried-and-established components, and features various connection options and control elements.
Evaluating up to 70,000 measuring points/s, the system is able to determine the depth of the keyhole even in highly dynamic welding processes. And with a resolution of just a few micrometers, even the most minute process deviations are precisely detected. Welding depths down to 8mm are currently being field-tested.
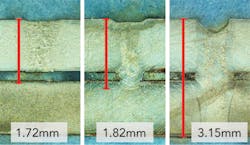
IDM is suitable for a broad range of applications. In gear welding, the welding depth in butt joints can be captured. It is extremely important to consider that with the majority of applications, the component must not be welded through completely. IDM detects when a maximum welding depth is exceeded during machining. In car body welding (FIGURE 2), high requirements are set for achieving a minimum and a maximum welding depth. If the welding depth is too small, no connection is made with the joining part. But if it is too great, the seam bead can be seen on the rear side and this is not an attractive look for visible parts. Here, too, IDM permits the welding depth to be observed throughout the joining process so that it can be optimized at the earliest possible stage.
Energy saving is another trend in industrial production processes. Savings can be made by reducing the laser power and, hence, the welding depth to the absolute minimum required. To guarantee a minimum connection to the joining part despite a reduced welding depth, IDM continuously records the welding depth for each individual component.
Validation activities on the system at the first customers in plant engineering, the automotive industry, and research institutes are well underway. The positive feedback from this work, coupled with other market requirements, is testimony to the enormous demand for this measuring system.
MARKUS KOGEL-HOLLACHER([email protected]) is head of department R&D projects at Precitec Optronik GmbH, Gaggenau, Germany.

