Direct ablation enables curvilinear cuts in high-center-tension, chemically strengthened glass
Mathew Rekow, Yun Zhou, and Nicolas Falletto
More Industrial Laser Solutions Articles |
Picosecond lasers come of age for micromachining |
Mechanical scribe and break, grinding, and sawing have been mainstays of glass processing for centuries. Even with the microelectronics revolution, these age-old techniques have continued to be the dominant glass processing techniques. When high-power lasers came on the scene in the 1960s [1], glass cutting quickly became a target application. Many innovative techniques were developed, but even so the economics and complexity of a laser-based system compared to a saw and blade prevented universal adoption in industrial processes. In the 2000s, the introduction of chemically strengthened glasses that defy traditional cutting techniques has tilted the playing field in favor of the laser. The result has been an explosion of new lasers and laser techniques for processing glass. Some of these techniques, such as Diamond Blaze by ESI, produce very fast linear cuts with excellent quality. However, in today's micro-electronics markets, curved corners and internal curved features for home buttons, speaker holes, and so on require a different technique. For example, at Eolite we have developed a proprietary process that produces both internal and external curved and linear cuts with very high yield in highly chemically strengthened glasses. The force of air jet or even just gravity is enough to remove the cut parts, and the cut quality is comparable to a ground edge, reducing or eliminating the need for post processing to remove damage.
Chemically strengthened glasses: Structure
Chemically strengthened glass has its origins in the 1960s with the development of a glass by Corning called Chemcor [2] that found use in the automotive, aerospace, and pharmaceutical industries but apparently never became a mainstay in the industry. However, in the early 2000s, the technology was revived and improved under the trade name Gorilla Glass and rapidly became the dominant cover glass for smart phones and tablet computers. By the end of May 2013, it is estimated that more than 1.5 billion devices had been sold that utilized Gorilla Glass [3].
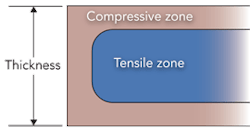
The fundamental process of creating Chemcor is still the fundamental process used to make Gorilla Glass. A sodium glass is immersed in an alkaline bath that induces the sodium ions to diffuse out from the glass, while larger potassium ions from the bath diffuse in [4]. Because the potassium ions are larger than the sodium ions, the surface of the glass is left with a large residual compressive stress, as shown in FIGURE 1. This compressive stress in turn prevents cracks from opening, thereby limiting the stress at the tip of any cracks that are introduced, reducing their ability to propagate and induce failure in the component. The result is a glass many times more damage-resistant than unstrengthened glasses and that can stand up to the daily stress and strain that a typical smart phone will encounter.
This compressive surface stress has obvious benefits for the mechanical performance of the glass, but this same enhanced toughness comes with a down-side: traditional scribing and sawing processes become more problematic. For the highest strength glasses, cutting by traditional means is literally impossible. The very same feature that makes the glass so strong makes it very difficult to cut mechanically. First of all, a scratch has to be very deep and the applied force must be very high to break a material. At the same time, once the scratch is deep enough to reach the tensile zone in the middle, crack tips are under tensile stress, causing rapid, spontaneous, and chaotic propagation of cracks in the tensile center layer. The resulting uncontrolled and irregular crack propagation through the center layer often results in the destruction of the entire part. A new cutting methodology is needed.
Laser technology development
One of the first patents specific to laser processing of glass was issued in 1969, and several others followed shortly thereafter [1, 5, 6]. Since then, these laser techniques for glass cutting have become commonplace. However, for large industrial operations, sawing, scribing and breaking, and abrasive cutting are the dominant techniques [7]. For the first generation of chemically strengthened glass, these traditional techniques were sufficient, but with the increasing stress levels of the newest generations of glasses, they have become unviable.
glass-cutting process.
A new generation of laser processes such as the Diamond Blaze process from ESI [8] has come to the forefront to make high quality and fast straight cuts. In these processes, a controlled amount of damage is introduced in the tensile layer and/or the compressive layers. The very high internal stress causes cracks to propagate along the laser processed line and the components spontaneously self-separate along the laser treatment line. Generally, however, these techniques are limited to straight cuts. Other techniques have been developed that can, to some degree, achieve curved cuts, but since there is effectively zero kerf width, separation of the components can be a problem because the cut parts are effectively locked inside the hole they were cut from.
The laser glass cutting technique we have developed at Eolite uses a picosecond pulse laser to produce microscopic chips in the glass, producing more and more chips until the material is effectively cut through. While this results in relatively modest cutting speeds, the process is universal for all types and thicknesses of chemically strengthened glass and is inherently scalable with laser power. Furthermore, kerf walls are nearly vertical; components singulate with negligible applied force; and the surface finish and chip size are comparable to fine grinding.
Process setup and equipment
A 30 W, 515 nm picosecond fiber laser, the Hegoa, was utilized to develop this process. This laser produces between 15 and 50 ps pulses at repetition rates up to 3 MHz. The collimated laser beam was expanded to about a 12 mm beam diameter to yield about an 8 µm diameter spot at the focus of a 100 mm focal length F-theta telecentric scan lens. The scanner was then used to move the focus spot as required to produce the various cut geometries reported. The scanner was mounted on an automated z-axis to control the depth of the focus spot on the work piece. For this work, the maximum pulse energy used was 20 µJ.
Glass cutting process
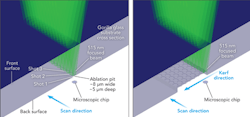
The 515 nm laser beam is focused to about an 8 µm spot size, and a galvanometer scanner is used to move the laser spot on the work surface at speeds up to 10 m/s. The combination of a small focus and a very short picosecond pulse duration results in a strong nonlinear interaction at the focal point. This in turn allows the unfocused beam to freely pass through the glass without deleterious heating and thermal lens effects, enabling the focal interaction spot to be placed at the far (usually bottom or back) surface of the material. Every laser pulse then removes a tiny chip of glass with geometry similar to the spot size (FIGURE 2a). The athermal nature of the picosecond interaction insures that most of the excess heat energy is carried away with the glass chip, and residual heating of the substrate is minimal. As the laser beam is then translated along the scan direction, a shallow groove is cut in the surface of the glass.
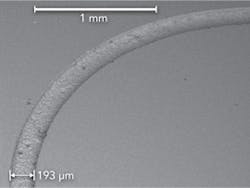
The focal spot is then repeatedly scanned along a desired path with offsets added at each repetition of the path as needed to generate a kerf of desired width (FIGURE 2b). Continued repetition of these paths, with occasional adjustments in the vertical axis to keep the laser interaction zone at the evolving cut surface, rapidly cuts through the entire part. The process can be terminated before penetration of the strengthened layer to create a surface trench, as shown in FIGURE 3. Provided the compressively stressed layer is not breached, such trenches are stable and will not cause failure of the part.
Process physics
At first glance it is not clear how this method of cutting avoids chaotic and spontaneous crack propagation as the laser cut approaches the tensile inner layer. However, we have utilized this methodology to make hundreds of cuts in the highest center tension (C.T.) and thinnest (400 µm) strengthened glasses in the marketplace with yields > 99%. We believe that the key feature comes from the basic principles of fracture mechanics.
First of all, fracture mechanics indicates that there is a critical crack length above which a crack propagates uncontrollably with very little energy input. For glass with a C.T. of 91 MPa, the critical crack length can be calculated to be about 5 µm using Griffin's criterion (see EQUATION below), where E is Young's modulus, γ is the surface energy density for glass and σ is the applied stress:
Comparing this 5 µm critical crack length to the processing spot size of about 8 µm gives insight on how this process avoids catastrophic spontaneous crack propagation, namely no cracks are introduced that are larger than the critical crack length. Furthermore, we have observed that arresting the cutting process within the center layer (the one under tensile stress) results in fracture after some length of time, indicating the machining process proceeds faster than the rate of spontaneous crack growth in that layer. This simple combination of small chip size with reasonably rapid cutting rate appears to explain how this process avoids chaotic fracture of the material.
Process results
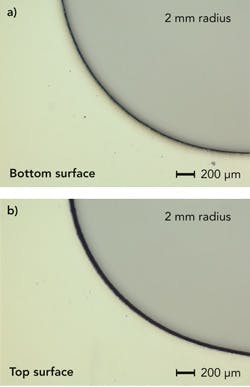
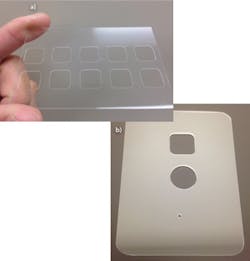
This bottom up cutting process creates clean cuts with nearly vertical side wall and maximum top and bottom edge chip sizes approximately equal to the processing spot size of 8 µm. We have found that the same basic process parameters are sufficient for cutting glasses from 0.4 to 2 mm in thickness and from zero up to 91 MPa C.T. with process yields greater than 99%. FIGURE 4 shows the cut edge's top and bottom for an internal cut feature in 700 µm thick C.T. = 40 MPa glass. The maximum observed chip size is approximately 10 µm for both the top and the bottom of the cut. The dark edge is shadow and is not indicative of any actual discoloration of the glass. The taper was measured at about 5 degrees. FIGURE 5a shows the applied Hegoa process create 10 holes in a 40 x 60 mm sheet of 400 µm thick C.T.91 glass. The yield over a sample of 20 sheets each with 10 square holes was 100% (200 total internal cuts). FIGURE 5b shows the cut process result for square and round holes 10 mm in diameter, a round hole 2 mm in diameter, and external rounded corner cuts.
Process speed
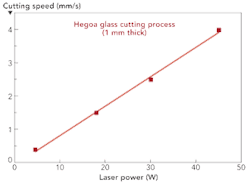
In order to compensate for the relatively small amount of material removed per laser shot, the scanner is operated at its maximum velocity and the laser at high pulse repetition frequency (PRF). Even so the velocity of the galvanometer scanner is the limiting factor in determining process speed for the Hegoa G30 laser (515 nm and 30 W maximum). FIGURE 6 shows the result of a scalability experiment that demonstrates that the cutting process in 1.0 mm thick glass material is linearly proportional to the laser power. Proportionally higher speeds are achieved on thinner glasses. In processing the various shapes of FIGURE 5, smaller corner radii limited the scan speed to 5 m/s, hence the real process speeds for this work were about 2.5 mm/s, utilizing only about 14 W of the available laser power.
Conclusion
We have demonstrated a simple cutting operation with a picosecond fiber laser that is capable of making both internal and external cuts in chemically strengthened glasses such as Gorilla Glass at the highest center tension values and thinnest form factors available in the marketplace. Furthermore, this process has been shown to be nearly universal across all tested glass types, requiring only a change in the total number of passes depending only upon the glass thickness. Process speeds were demonstrated up to 4.0 mm/s for 1.0 mm thick material with linear scalability with glass thickness. With process optimization, cutting speeds from 6 to 8 mm/s are achievable for 0.4 mm thick C.T. = 91 glasses. The Hegoa glass process can be paired with high-speed linear cutting processes to enable both rapid singulation of large glass panels and efficient production of internal and external curved features. ✺
References
1. W. Hafner, "Method of Working Glass with Absorbent by a Laser Beam," 3,453,097 USA, July 1, 1969.
2. D. Pogue, "Gorilla Glass, the Smartphone›s Unsung Hero," NY Times, December 9, 2010.
3. Corning Inc., Corning Inc. News Releases, http://www.corning.com/news_center/news_releases/2012/2012102401.aspx. [Online] October 2012. [Cited: January 16, 2014.].
4. Corning Inc., "How It's Made," http://www.corninggorillaglass.com. [Online] 2014. [Cited: Jan 16, 2014].
5. F. J. Grove, "Cutting of Glass with a Laser Beam," 3,543,979 USA, December 1, 1970.
6. W. Verheyen, "Glass Cutting," 3,932,726 USA, January 13, 1976.
7. F. Gaebler, "Laser glass cutting in flat panel display production," Industrial Laser Solutions for Manufacturing, June 2008.
8. ESI Inc., "ESI Announces the DiamondBlaze Product Line for Strengthened Glass Singulation," http://investors.esi.com/. [Online] January 11, 2013.
Mathew Rekow ([email protected]) is applications manager, Yun Zhouis is an applications engineer, and Nicolas Falletto is product manager, all at Eolite Lasers, a subsidiary of ESI Inc., Portland, OR.
