KINGSTON, ON, CANADA – In terms of innovation, automotive technology never stands still. For those looking to reinvent the gear (or at least manufacture it more efficiently), there are new, production-tested options ready to improve the process. A monitoring and control technology produced by Laser Depth Dynamics is giving industrial laser users unprecedented flexibility and confidence in how they record and control their welding processes—and automotive powertrain applications are a highly active area of adoption.
LDD's measurement technology, Inline Coherent Imaging (ICI), is the first industrial solution for direct penetration depth measurements in laser welding. ICI works by adding a second low-power laser beam to the welding head, routed through the same focusing optics as the process beam. This secondary beam is used to take high-accuracy distance measurements hundreds of thousands of times per second. The end result is the ability to resolve the very bottom of the keyhole, as well as the surface of the welding workpiece, while the process laser is on and welding. The system bears a number of advantages for rotary welding applications commonly seen in production of powertrain components.
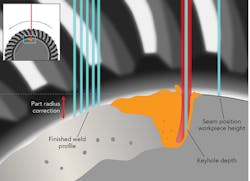
For setup and alignment on a round part, an ICI system can play the role of an inline camera. However, the 3D resolution and immunity to ambient lighting conditions empower system users to pinpoint the desired welding path, focus height, and part apex with precision on the order of 10μm. All three aspects of this initial alignment are critical to a repeatable process when welding around the outside of a circular part (FIGURE).
ICI reports direct measurements of the keyhole depth over the entire length of the weld. This technology also offers multi-factor monitoring, made possible by actively pointing the measurement beam to different sites on the part during the weld. This allows a single system to measure seam position, distance from the head to the workpiece, and the profile of the finished weld bead, all during a single welding pass. This monitoring scheme looks for welding defects and their root causes immediately before, during, and after the passage of the process beam within the region visible through the welding optics.
For rotary welding, the combination of seam position and head/workpiece offset measurements detects workpiece wobble during welding, whether it is because of fixturing error, a failed press fit, out-of-round parts, or in some cases deformation caused by the weld itself. Seam position monitoring can be used to ensure butt welds are on target, or to check lap weld position by tracking a nearby edge. ICI is an effective solution for fiber, disk, direct-diode, and CO2 laser welding processes, and is compatible with many wire-feed applications.
The keyhole depth measurement results are comparable to those obtained from cut and etch, but they cover the entire circumference of the part, corresponding to cut geometries that would be either extremely difficult or effectively impossible to produce in the metallurgy lab.
Additionally, ICI stores a record of every part produced, rather than a small subset sampled for destructive testing every batch or shift. Heavy and precisely machined components like helical gears make for expensive scrap, and the demanding loads these parts must bear in service mean that certainty in the integrity of the joints is crucial. Having the ability to assess parts individually rather than through segregating batches can result in massive time and money savings.
The key advantages seen by users in the automotive powertrain segment are reduction in the overall cost and efforts expended on quality assurance procedures, scrap reduction, and drastically increased confidence in the products they ship to their customers.
This article was supplied by Chris Galbraith ([email protected]) and Paul Webster of Laser Depth Dynamics, Kingston, ON, Canada; www.laserdepth.com.
