How to select the right laser for marking corrosion-resistant surfaces
Many single- and multi-use stainless steel medical tools and devices require passivation to help them withstand corrosion and handle numerous autoclave cycles. At the same time, these parts also require laser marking for identification, tracking, and traceability in accordance with new unique device identification (UDI) requirements. Unfortunately, passivation and autoclaving tend to remove laser marks, and the issue of fading or disappearing laser marks is a daily battle for many contract manufacturers and end users.
Across the medical device industry, there are a number of steel types and surface finishes that create issues in maintaining a passivation-resistant mark process. New laser technology coming on the market offers a successful approach for overcoming these issues and for providing mark stability in production environments. For example, Amada Miyachi America has developed several tiers of system solutions, ranging from a standard fiber laser marker to a picosecond laser marking system, each delivering consistent, reliable dark marks. Material and surface finish will dictate which system will work best for a particular application.
Medical devices
Medical devices or surgical tools are manufactured from materials selected for mechanical strength, resistance to corrosion, and inertness to the body. The most commonly used materials are stainless steel 304 and 17-4. These materials have a natural passive, corrosion-resistant layer consisting of chromium oxide that also resists repeated sterilization cycles, and an inert surface that will not cause reaction inside the body.
However, during the manufacturing process, multiple machining steps remove or degrade this passive surface by embedding iron chips and particles from the bulk material into the surface. The material must then be put through a passivation process, which rebuilds the passive layer. During passivation, iron is removed from the part's surface, which also removes any potential corrosion sites.
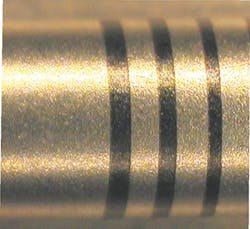
The style of mark required by the medical device industry is called a "dark or annealed mark." This mark does not remove any material from the part and so avoids any potential for any contamination to collect. When handling the part, the dark or annealed mark must not be able to be felt on the surface of the material. FIGURE 1 shows typical dark marks used on medical devices.
The process of creating the mark requires a build-up of an oxide coating that turns dark at a certain thickness. To build up this oxide layer, a certain quantity of heat input is necessary, which tends to degrade the passive layer on the marked surface. This heat can cause local migration of alloying elements. After marking, if the surface layer of the part has an imbalance of chromium, it will be etched away by the acid used in the passivation process, causing the mark to fade or disappear completely. The level of imbalance determines whether the mark fades over repeated sterilization procedures and, if so, how quickly.
There are a number of passivation processes that use either citric or nitric acid, at room temperature or an elevated temperature for a certain period of time. The selection of the passivation method may be made by the end user following the ASTM A967 standard.
More recently, manufacturers have been moving to citric acid because of its reduced chemical footprint when compared to nitric acid. It is worth noting that from a laser marking perspective, citric acid is also preferred, as it tends to be less aggressive to the mark. It is also worth noting that using nitric actually degrades the mark's lifetime in autoclave cleaning cycles.
There are really no alternatives to the permanent laser marking process for devices that require passivation. For example, an ink-jet mark is non-permanent and contains chemicals that are not FDA-approved. Chemical etch is not practical for marks that require incremental serial number and lot codes, as well as data matrix codes. Mechanical pin stamp machines create indentations in the surface that cannot be cleaned properly, and provide poor mark resolution.
Regulations and identification requirements
In September 2007, the US Food and Drug Administration (FDA) signed into law a requirement to assign a unique identifier to medical devices to better identify potential problems or device defects, and improve patient care. Prior to this, there had been no FDA-mandated requirements to mark medical device parts. However, certain companies—mostly manufacturers of implantable devices—did mark parts for internal tracking and traceability as a precaution in the event of patient incidents.
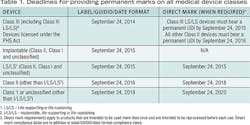
Formalizing and standardizing part marking brings industry-wide reliability and consistency to the identification and traceability process. The timeline for introduction of the UDI system depends upon the type of product and method of marking. The first meaningful milestone for laser marking was in September 2015 for Class III implantable, life-supporting, and life-sustaining (I/LS/LS) devices. TABLE 1 provides an overview of deadlines for providing permanent marks on all device classes.
Prior to the mandated UDI marking requirements, many manufacturers used direct laser part marking for alignment and depth aids, as well as logos and part numbers for aesthetic reasons. The dark mark that the laser can produce on stainless steels and titanium is valued by manufacturers because it provides visibility from all angles, avoids removal of material that could present sites for contamination, and projects a certain level of product quality to the end user.
Laser selection for marks on stainless steels
Many end users and contract manufactures alike struggle with making passivation-resistant and anti-corrosion marks on stainless steels. They either use the right laser with incorrect parameters settings, or simply select the wrong laser for the mark. Many have found increasing difficulties in creating the required mark with the material selected, or achieving the desired material surface finish and heat sinking around the mark area.
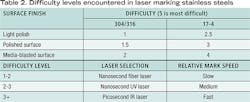
TABLE 2 is a guide to the difficulty levels encountered—it shows the increasing difficulty with marking 304/316 and 17-4 with surface finish, as well as a basic guide on which laser to use. It is worth noting that processing speed can increase when using ultraviolet (UV) nanosecond and particularly infrared (IR) picosecond lasers.
After selecting the most suitable laser source for the application, it is important to establish the correct heat balance process window for each part and each mark on that part. The size of the letters, the number of letters, and the thermal mass of the part area are all significant factors in the equation.
There are so many parameters that can be adjusted on the laser and the scan head that the starting point may seem somewhat daunting. The path to success is iterative. It is essential to get instant feedback in the form of a passivation test immediately adjacent to the machine. Finding the starting point from which marks can be developed based on controlling the heat balance is the crux of the problem because there are false summits that do not provide a stable process.
The extremely limited amount of published work on this type of marking suggests that minimizing heat input is preferred and this is reflected in the laser selection. However, this is only one piece of the puzzle, and taken in isolation it is difficult to reconcile with the fact that the dark mark by its nature requires significant heat input to the part. Other key factors include using a uniform heat source on the part, and controlling the rate of heating and cooling. This foundational work provides a starting point to fine-tune a specific mark.
FIGURE 2 contains scanning electron microscope (SEM) pictures of the surface of 17-4 stainless steel, where (a) is a fiber laser mark that passed hot nitric passivation, (b) is a fiber laser mark that failed hot nitric passivation, and (c) is an IR picosecond laser mark that passed hot nitric passivation. The picture's scale is 50μm.The fiber laser mark that passes passivation (a) looks quite similar to the one that does not (b). However, a higher magnification mark (a) shows surface cracking of the oxide layer compared to the mark that does not pass, which seems counterintuitive. The picosecond laser (c) mark surface appears completely different, with what appear to be micro-features when compared to the base metal. At this point, it is unclear what the details of these microstructures are. In addition, an energy-dispersive x-ray spectroscopy (EDX) surface element analysis was also completed, which showed that the amount of chromium present in the mark area that passed passivation was comparable to that of the surface of the base metal. Marks that did not pass had about 15% lower chromium level.
Selecting the right laser source
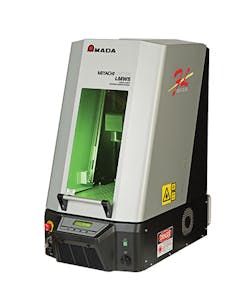
The laser source needed to produce passivation-resistant marks is directly related to the material, surface finish, and speed of the required mark. This ranges from a standard fiber laser marker, like the benchtop fiber laser workstation shown in FIGURE 3, up to a picosecond laser. FIGURE 4 shows an example of a UV laser mark on 17-4 stainless steel after hot nitric passivation.Producing a dark mark for passivation resistance in 304, 316, 17-4, and even 17-7 stainless steels can be achieved using a variety of laser sources, including nanosecond fiber, nanosecond UV, and IR picosecond lasers. However, to achieve such a mark, one must have a clear understanding of laser parameters, with specific reference to uniform heat input. A universal marking solution for every part and each mark does not exist—rather, one can establish a starting point that can be used to develop each mark on each part. For example, the fiber laser marker can be used on 300 series stainless and in some cases 17-4 steels. However, as the material and surface finish increase in difficulty and cycle times, one must consider nanosecond UV and IR picosecond solutions.
Selecting the correct laser source for the part and the required mark will lead to a process that is stable in everyday production. This is critical because there can be substantial costs associated with an unstable mark in terms of inconsistent yields, re-working parts, missing delivery schedules, and constant process tinkering. Aside from saving labor costs, the process provides a consistent machine output that can be planned for and counted upon.
REFERENCE
1. M. Petty, "Case study: a failing laser mark," The Laser User, 58, 20–21 (Spring 2010).
Geoff Shannon, Ph.D. | Director Strategic Marketing for Precision Manufacturing, Coherent
Geoff Shannon, Ph.D., is Director Strategic Marketing for Precision Manufacturing at Coherent (Santa Clara, CA) and an Editorial Advisor to Industrial Laser Solutions. He previously served as Laser Technology Manager for Miyachi Unitek, specializing in the development of lasers and applications for existing and new markets. Shannon has a BEng in Mechanical Engineering and PhD in Laser Welding Technology from the University of Liverpool. His 20-year career in laser technology has centered around applications research and development and new product development of lasers and systems.
Gary Firment | Chief Scientist, Laser-Micro LLC
Gary Firment is Chief Scientist at Laser-Micro LLC (Northridge, CA).


