There are many applications for lasers in the world today with even more on the horizon. In order to apply a laser to an industrial process, medical therapy, or communications technology it is usually necessary to modify the laser beam to achieve the desired results. Laser beam measurement tools make this possible. In this article, we will discuss how to match an appropriate laser beam profiling technique to a laser application. The topics will include building an aligned optical system, collimation and focusing, high-power laser quality measurements, and proper attenuation techniques for making accurate laser measurements.
Building an aligned optical system
Many laser applications are based on a system that includes a laser with associated optics to deliver a laser beam of known size and position. Examples of these are as diverse as laser printers and marking machines, laser range finders, LIDAR or military targeting systems, and laser projection systems for movie theatres. What all of these have in common is the need to put a beam of a certain size at a certain place in space. Using a beam profiler allows this to be done quickly and efficiently — simply place the profiler where the beam is to be aimed and measure the size and position.
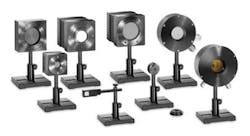
These parameters can be adjusted with direct feedback from the profiler. Beam profilers can be based on either CCD or CMOS array or scanning slit technology (Fig. 1). Each has its advantages. Arrays will provide a true two-dimensional image of the beam and show any irregularities in power distribution; scanning slits will provide an xy profile, but can measure much smaller beams, as small as 10 micron, and will require little or no attenuation or adjustment to the profiler itself. In addition, the scan plane of the slit profiler is very well known, allowing the z-location of a beam waist to be located very accurately. Both camera and slit profilers can determine the x-y position of the beam in space to less than a micron.For applications where pointing accuracy is very important it is necessary to isolate linear and angular pointing error and also to eliminate external influences on the measurement. Pointing accuracy is dependent on the profiler, the fixturing of the laser system, and external influences. Localized heating, air currents, and vibration all contribute to uncertainty in pointing measurements. One way to isolate external influences is to shrink the measurement to as short a distance as possible. Rather than measuring pointing over a distance of tens of meters, using a very accurate profiler on the bench top can deliver better results. By using scan averaging with a NanoScan slit scanning profiler, it is possible to measure pointing accuracy to submicron precision, allowing a range finder to be aligned in a very small test fixture.
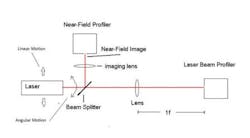
Isolating linear from angular pointing error can be done with a two profiler method. By splitting the beam and looking at the near-field and far-field through an f-theta lens, these motions can be separated. Angular motion will show up as a shift in the near-field measurement, but will not be seen in the far-field due to the f-theta correction. Linear motion, on the other hand, will be seen in the far-field as a shift in position on the far-field profiler.
This may be more than most applications need so simply placing the profiler where the beam is to be delivered is usually enough.
Collimation and focusing
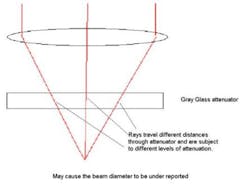
Other applications often require that a laser either be focused to a particular beam waist or collimated to a minimally diverging or converging beam. Focusing can be a fairly simple process for low-power beams, such as those used in fiber optic telecommunication or point-of-sale scanners. It is much more complicated for higher power applications like ophthalmic surgery, medical therapeutics, or precision welding. For a low-power application, one can simply place the profiler at the focus point and adjust the optics until the desired beam size if obtained. This is routinely done with passive optical components for free space coupling of fiber.The attenuation in Fig. 4 is much simpler than is normally used, and it would still cause distortion. The solution to this problem is to image the beam waist with a lens, with the attenuation added to the image.
This method can also be used with a scanning slit profiler to reduce the power density of the beam, again geometrically. For example if one has a 15 W laser beam that is focused to 10 µm, the power density would exceed the damage threshold of the slit material. However, by expanding the beam 10X, the power density will be reduced by 100-fold, bringing it back to the safe level.Collimation
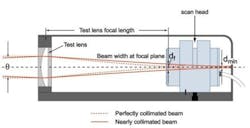
Collimation is the opposite of focusing, that is, it is the process of making the laser have the same diameter for as long a distance as possible. Laser applications that need this type of adjustment include laser point-of-sale scanners, LIDAR and range finders, guide stars, and free-space optical communications, basically anything that needs a beam that maintains a uniform beam size over a long distance. Another application is the collimation of a large beam that will then be focused to a small diameter.It is also possible to use the above divergence measurement technique to achieve the divergence that will provide the proper distance-to-the-waist desired. There is a more thorough discussion of collimation of Gaussian beams in Donald O’Shea’s Elements of Modern Optical Design [1].
High-power beam quality measurements
High-power lasers are used for many industrial applications, particularly high-precision laser welding, laser brazing and laser cutting operations. The laser is well suited to these operations and can be rapid and efficient, but only if the laser is operating properly and delivering the correct beam shape and power to the work piece. To guarantee this, several things can and should be measured periodically:
* Output power or energy
* Spatial or beam profile
* Waist position
* Temporal profile (for pulsed beams)
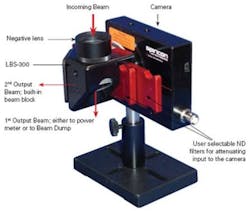
Further information about the laser’s performance is provided by beam profiling, as discussed above. However with high-power lasers, beam profiling becomes more complicated due to the potential for damage to the profiler. Using attenuation devices, lasers can be sampled by camera-based array profilers, which will provide measurement of beam size, shape, spatial energy distribution and beam wandering. Both array-based and scanning-slit-based profilers can be used to measure focused spots to ensure that the laser beam being delivered to the work piece is of the proper size to do the required job. Other types of profilers such as a rotating pinhole or a spinning wand are able to sample a small portion of the beam and construct an image of the profile, beam caustic, and energy distribution of the beam.
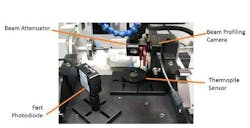
For pulsed beam measurements, the temporal profile of the pulses can provide additional important information about the performance of the laser for a particular operation. Leading edge spikes can cause a laser to create uneven welds or ragged cuts. A fast photodiode can provide a good picture of the temporal profile to see if poor performance of the laser system is the result of irregular pulses or some other cause.
Proper attenuation design for laser measurement
There are two basic types of attenuators used when making laser measurements: reflective and absorptive. Within these two categories, there are different types and materials, but they effectively work in the same manner. Absorptive attenuators are the colored or gray-glass filters that work by absorbing some portion of the light, and they may be made of glass, plastic, or Inconel. Because they absorb light, they are subject to heating, which then changes the optical properties of the material in a process called “thermal lensing.” The localized heating in the filter material forms a lens that can then modify the beam, causing erroneous profile information. Reflective attenuators, such as laser end mirrors, quartz wedges or prisms are not as susceptible to this phenomenon, and therefore should usually be used for the first stages of attenuation of any lasers with powers greater than 100 mW/mm diameter or 12.7 W/cm2. This happens fast and may give the appearance of a stable laser profile.
The following experiment shows this dramatically:
Experimental design
An unfocused CW beam from a 532 nm laser with a nominal power of 500 mW was measured using three methods.
Method 1
Using the camera array beam profiler with all the attenuation provided by absorptive filters, the beam was measured at a point 30 cm from the exit aperture of the laser. The attenuation comprised a 2.8 outer diameter (OD) gray-glass fixed filter and a continuously variable wedge attenuator (1.7–4.6 OD).
Method 2
The first stage of attenuation was provided by using a front-surface reflection with additional attenuation provided by the attenuator. The rest of the measurement setup remained identical to that in Method 1.
Method 3
Measurements were then taken at the same measurement plane with a scanning slit profiler, which needed no attenuation for this laser power.
Results and discussion
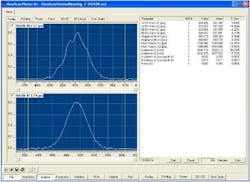
Because we expected to see thermal effects in the initial experimental design (Method 1), we used time charting to observe the measurement of the laser. In order to see any effects and eliminate any contribution from the laser itself, we started the camera and then uncovered the laser beam. There was an immediate spike (Fig. 10) of the beam size to around 700 micron. It settled to a value around 500 micron (1/e2) within a few milliseconds. With each measurement, we saw a similar pattern; however, the value of the initial spike was somewhat variable.Had time charting not been employed, the measurement would have appeared to be stable at the 400–500 micron beam size.
When this same experiment was repeated using the front-surface-reflection attenuator, the spiking effect was no longer visible, and the beam measurement was ~850 micron in one axis and 914 micron in the other.
Measurement with the scanning slit profiler showed a beam size measurement of ~850 micron.Conclusion
Matching your profiling technique to your laser application will allow you to monitor and adjust your laser system to meet the requirements of the job at hand. In many cases, a laser profiler will make the process of building a laser system much more efficient and accurate.
For more information, contact the Ophir Photonics Group at http://www.ophiropt.com/photonics.
Reference
1. Donald C. O’Shea, Elements of Modern Optical Design, John Wiley and Sons, 1985, pp. 241-245.
Allen M. Cary | Director of Marketing, Ophir Photonics
Allen M. Cary is director of marketing at Ophir Photonics (Logan, UT).

