In-process vs. at-process monitoring in industrial laser processing
Abraham Lincoln once said, “You can fool all of the people some of the time and some of the people all of the time, but you cannot fool all the people all the time.”1 When approaching the question of monitoring the performance of a laser integrated into a system, the same is true. You can monitor all of the system some of the time, you can monitor some of the system all of the time, but you cannot monitor all of the system all of the time. In the age of Industry 4.0, a.k.a. smart manufacturing, it’s important to understand the difference.
Industry 4.0 is changing manufacturing across all industries. Technology is helping manufacturers produce parts more efficiently, more quickly, and, in general, more intelligently. To properly apply smart machines, there is a need for data. Eventually, this data must be interpreted and filtered to improve the process. Too little data hinders process improvement—but at the same time, too much data can be counterproductive.
Systems that involve a laser process have their own set of operational characteristics and associated problems. Too little data about how the laser is performing does not help the laser operator fully understand how to manage changes within the laser system. Too much data about how the laser is performing is overwhelming, confusing, and ultimately counterproductive.
When to measure laser performance
There are four approaches to measuring a laser’s performance characteristics. The first is what most laser system operators gravitate toward: Periodic maintenance. In this approach, the laser’s performance is measured based on scheduled downtimes of the laser, usually quarterly, semiannually, or annually. During this time, measurements of the laser’s performance characteristics are taken and compared to previous measurements to analyze laser behavior trends.
The second approach is to measure the laser during some kind of process failure in which the laser is involved. For example, a welding laser will show a degradation of the welds, or a cutting laser will lose its cut or stop cutting altogether. Laser performance characteristics are measured to bring the laser system back into its designed operational parameters.
The third and fourth approaches are what this article will discuss: In-process monitoring and at-process monitoring. Both approaches have pros and cons that need to be understood by laser operators when trying to determine how best to understand the way their lasers are processing. Laser operators must also understand which measurements of the laser system are important at the production stage of the laser’s life.
How the laser processes material
At a high level, a laser operator must understand how the laser processes the material, regardless of which process the laser is being applied to—for instance, how a type of laser welds vs. how that laser welds a doorframe on an automobile. The simplest way to understand this is through laser power density.
Power density is defined as the amount of laser light that is applied to the material per unit area. Power density is often expressed through the formula: W/cm2, where the “W” stands for “watts,” the unit of laser continuous-wave (CW) power or average power (for pulsed lasers), and the “cm2” represents the area of the laser’s spot size at the working plane. For example, a laser operating at 100 W of CW or average power focused down to a spot size of 100 µm would yield a power density of 2.6 × 10³ kW/cm2).
The laser’s power density can be affected by changes in either the amount of laser light or size of the beam being applied to the material. It’s important that the laser operator measures, analyzes, and understands both variables to maintain a successful laser process.
Vital laser behavior measurements
Measurement of the amount of laser light is achieved through what is commonly known as a power meter. A power meter is a sensor that collects laser light, converts that laser light to an electrical signal which is then extrapolated into the amount of power or energy that the light is producing, and it ultimately provides a reading to an attached meter or local PC for analysis. This process usually only takes a few seconds, but can vary depending on the technologies used. These measurements are important to collect and analyze, especially during the production phase of the laser’s life, because it tells the laser user how laser performance is changing and how these changes affect the laser’s application to the process.
Overall beam diameter must also be measured. There are different methods that can be used: D4σ, 13.5% of peak, and 10/90 knife-edge each calculate beam diameter, but can produce very different results. All are used by people in different industries, with different backgrounds and experiences.
The roundness of the beam, or ellipticity value, must be considered when calculating beam diameter. Beam shape, and how the energy is distributed across the beam profile, must be understood. Is the beam a Gaussian beam? Is it a flat-top beam? All these measurements, and more, can and should be made via an industry-standard beam profiling system when attempting to understand how the laser is applied to the process.
Beam quality must also be considered, whether you're selecting a laser, developing the application with a laser, or integrating or commissioning a laser source into a system. In most cases, beam quality analysis is rarely considered once the laser is deployed into production, so it is important to consider this analysis before this last phase of the laser’s life cycle.
Beam quality can be expressed as an M2 value, with the value of 1.0 being a perfect laser. Beam parameter product (BPP) and K are also expressions of laser quality. Laser sources have improved with respect to beam quality and the efficiency with which the laser light is produced, and different laser sources have their own strengths when it comes to the different processes where a laser is used.
It is important for the laser user to understand how the laser interacts with the process. Measuring the amount of laser light, the beam size at the process, and how and why these two important measurements change over time is vital to fully understanding system performance and ensuring more consistent long-term performance.
In-process vs. at-process monitoring
Today, there is a need for as close to real-time data input as possible. This calls for a technique commonly referred to as “in-process monitoring,” which involves monitoring laser performance measurements while the laser is processing. In the additive manufacturing world, this technique is known as “in situ monitoring.”
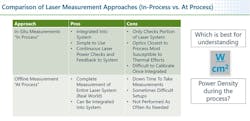
Another area that is important to understand is “at-process monitoring,” which is performed in between parts as they are processed and measures the laser performance at the plane where the laser is processing. There are important pros and cons that come with each technique (see Fig. 1).
In-process monitoring
In-process, or in situ monitoring, enables the laser system to measure the laser’s performance, in part, while the laser is operational and producing parts. Within the system is a strategically placed subsystem that measures a small fraction of the laser light and provides real-time analysis of the laser performance characteristic(s) it was designed to measure.
There are advantages to this approach. First, since the subsystem is integrated into the entire system, the two can easily communicate. Real-time feedback about laser performance is continually relayed so on-the-fly adjustments can be made to the overall system, if needed. Second, these subsystems are usually designed specifically for the system in which they are integrated and are often simple in nature, providing only the feedback that the customer needs. The information they gather can be easily presented at the human-machine interface that the laser operator sees. This data can also be stored, analyzed, and used for go/no-go actions for the safety of the system and the user, or to decrease scrap.
The primary disadvantage of this approach is that these subsystems only measure a portion of the laser system. A small sample of the laser beam is taken before it reaches the process and is analyzed during the process. Unfortunately, many of the problems that arise during processing are often due to degradation of components close to the process and after the laser measurement sample is taken from along the beam path. If a component degrades or fails during a process, the sample used for laser measurement can miss the degradation or failure and therefore give false feedback to the system.
Another disadvantage of this approach is the difficulty in calibrating the laser measurement components. Since the subsystem is integrated into the overall system, it is usually difficult or impossible to remove components to be recalibrated. Power measurement components must be calibrated frequently (Ophir recommends every 12 months) to ensure accurate measurements.
Many of these systems will provide other sensory feedback to the system to indicate the performance of the laser independent of the actual measurement of the light behavior. For instance, a temperature monitor of the cover glass, located close to the process and protecting the laser components, can tell the laser user when the glass is collecting so much process debris that it causes an increase in temperature from the absorption of laser light. These sensors also provide valuable information to the system and laser user.
At-process monitoring
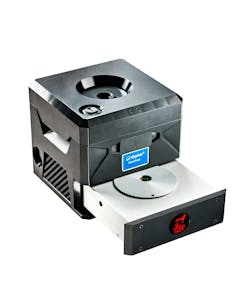
At-process monitoring usually uses a set of stand-alone products that take measurements at the point where the laser is processing and provide analysis of the entire laser system. These systems can consist of separate laser power/energy measurement products and beam profiling products, or products that simultaneously collect power/energy and beam profiling data (see Fig. 2). These systems, which can be dependent or independent of one another, can either be integrated into the overall system or used to perform periodic maintenance on the system between part runs.
Similar to in situ monitoring, at-process monitoring has strengths and weaknesses. The primary advantage of at-processing monitoring is a more complete evaluation of the entire laser within the system. A collection of 100% of the laser light for a power or energy measurement, along with an analysis of the laser’s focused spot at the process, provides the laser user with a fully comprehensive analysis of how the laser is performing at that point in time. This data can and should also be saved, stored, or logged within the overall system. The data can then be accessed for continual trend analysis, ensuring system efficiency following maintenance used during troubleshooting or for system restoration following a catastrophic event. The collection of data using this method ultimately gives the laser user a full understanding of laser behavior—but it comes with some costs.
The most common downside to applying this method is the downtime from production. Since the measurements are taken on the entire amount of laser light, the laser must be taken out of production to take measurements. If the laser measurement systems are integrated into the machine, this is usually not much of a factor—but time is money. Yet, having the convenience of the laser measurement system integrated into the overall system can be expensive and is sometimes seen as unnecessary. If not integrated into the overall system, the laser measurement products can be used as maintenance tools. Still, the laser must be taken out of production to take the measurements, and when a laser maintenance person is unfamiliar with the operation of the laser measurement tools, taking these measurements can be time-consuming. This can lead to measurements not being taken as often as necessary or neglected altogether.
Beyond this, there are other products that can provide the laser user with information about how the process is performing. For instance, several companies provide products that deliver real-time analysis of welding processes using a wide variety of techniques. These systems provide go/no-go or pass/fail limits on the welds to let the user know when there may be a problem with the system, and ultimately attempt to produce higher-quality parts and reduce scrap.
Ensure laser performance
Ensuring the laser performs consistently over its life is vital to maximizing and maintaining the consistency and efficiency of the process, prolonging the laser’s life and providing a higher return on the investment in the system. Only through objective measurement of the laser’s characteristics at the work site can a laser user know for sure how the laser is behaving.
Understanding how power density affects the material being processed is vital to an overall understanding of the process. And, understanding how changes in the laser system affect power density applied to the material will help the laser user understand how and when to take maintenance actions on the system.
Measuring the laser during the process or at the process both have pros and cons, but either method will provide important laser processing information. Laser performance measurement products are continually evolving, becoming easier to use and more robust for use within production environments. These products provide the laser user with information critical to understanding how the laser acts in a way that is easy to understand and for long-term laser maintenance.
REFERENCE
About the Author
John McCauley
John McCauley is senior business development manager for MKS Ophir, with a focus on automotive and directed energy applications. Previously, he served as their Midwest regional sales manager and product specialist for all markets. Since 1998, his background has been as an end user of, and an applications engineer working with, laser marking and engraving systems. He has also worked closely with several mid-Indiana metal fabricating customers.


