OPTICAL ASSEMBLY: Adhesive bonding is stable enough for LISA
One of the most demanding environments for optical systems is that faced by optics in NASA's proposed Laser Interferometer Space Antenna (LISA) gravitational-wave detector, which if flown will consist of three spacecraft forming a triangular optical interferometer with arms 5 × 10⁶ km long. Each spacecraft will hold within it a free-floating "proof mass" as a spatial reference; the distance between this proof mass and the craft's optical system must be continuously monitored to an accuracy of a few pm/Hz1/2 for frequencies between 10-4 and 1 Hz. This requirement is made even tougher to meet because the optics must hold together through launch as well as later thermal cycling in space.
For LISA, the technique chosen for bonding optical components together (for example, a Zerodur mirror to a Zerodur baseplate) will be of the utmost importance. Conventional optical adhesives are not stable enough, and optical contacting (a precision adhesive-free process in which two ultraclean, ultraflat optical surfaces are brought together and adhered through molecular attraction) would not necessarily survive the stresses of launch and thermal cycling.
Another approach
The leading candidate is hydroxide-catalysis bonding, in which a hydroxide is applied to two optical surfaces (again, very clean and flat) and the surfaces brought together; as water forms from the hydroxide and slowly evaporates, a silicate molecular network is formed between the surfaces. This technique was successfully used on the earth-based GEO 600 interferometric gravitational-wave detector in Sarstedt, Germany, which has arm lengths of 3 km.
However, hydroxide-catalysis bonding, while precise and strong, requires the two surfaces to be aligned quickly (within a couple of minutes), and has a long drying time (up to a month or more). For these reasons, German researchers at Astrium GmbH–Satellites (Friedrichshafen), the University of Applied Sciences (Konstanz), Humboldt-University (Berlin), and Furtwangen University (Furtwangen) turned back to adhesives and worked to improve the bonding procedure.1
Starting with a space-qualified two-component adhesive made by Henkel (Düsseldorf, Germany), a very small, measured amount of adhesive was applied to the two surfaces of a mirror and baseplate and a fixture used to press the mirror at a central point. Heat was applied for a short time, allowing the bond to reach handling strength after 75 min. After five days of curing at room temperature, the bond had reached full strength.
Measurements taken of both hydroxide-catalysis- and adhesive-bonded joints showed that the adhesive-bonded joints achieved angular (tip-tilt) misalignments just as small as those for hydroxide-catalysis-bonded joints. Further measurements showed that this was due to the small amount of adhesive having formed a uniform film 1.4 ± 0.3 μm thick (which was the result even for differing amounts of pressure applied by the fixture).
Extensively tested
The researchers then tested the two types of joints extensively by subjecting them to vibration, shock, and thermal tests and interferometrically monitoring the mirrors for any position changes. A custom heterodyne interferometer was built that could measure translation and tilt with noise levels below 10 pm/Hz1/2 and 10 nrad/Hz1/2, respectively, for frequencies higher than 10 mHz; because the range of absolute tilt measurements for the interferometer was limited, additional optics bounced laser beams off the mirrors and measured larger amounts of tilt in terms of displacement of the resulting beam spots.
Differential measurements were taken between two Zerodur mirrors fixed with hydroxide-catalysis bonding, as well as between one mirror fixed with adhesive bonding and one with hydroxide-catalysis bonding. To check stability, differential translations and tilts were measured over periods up to 60 hr for both setups, with results showing that adhesive bonding was as stable as hydroxide-catalysis bonding.
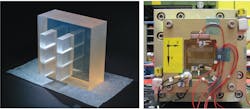
A "testboard" was placed on a shaker that produced a sinusoidal vibration with a maximum acceleration of 20 g at 60 Hz, a random test load of 0.8 g2/Hz between 100 Hz to 300 Hz, or a shock response equivalent to a half-sinusoidal pulse of 0.5 ms duration and 200 g peak (see figure). No changes were seen in the alignment of any mirrors.
The mirrors were also subjected to thermal cycling according to LISA requirements. They were cycled eight times between 253 and 323 K at a rate of change of 2 K/min, with minimum and maximum temperatures held for two hours. Again, no changes in mirror alignment were detected.
The researchers would like to test longer-term stability over months or years, as well as precisely assess absolute alignment tolerances.
REFERENCE
1. S. Ressel et al., Appl. Opt., 9, 22, 4296 (Aug. 1, 2010).
About the Author
John Wallace
Senior Technical Editor (1998-2022)
John Wallace was with Laser Focus World for nearly 25 years, retiring in late June 2022. He obtained a bachelor's degree in mechanical engineering and physics at Rutgers University and a master's in optical engineering at the University of Rochester. Before becoming an editor, John worked as an engineer at RCA, Exxon, Eastman Kodak, and GCA Corporation.

