OPTICAL MOUNTING: Choosing the right optical mount
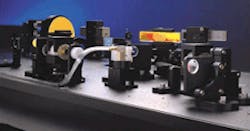
Elimination of long-term instabilities in products and experiments is crucial to both original-equipment manufacturers (OEMs) and laboratory researchers. To this end, optical mounts must be based on "kinematic" principles (which require one constraint or actuator for each of the six independent degrees of freedom) and must exhibit low thermal drift. But it is important also to consider how the optic is held in the mount, as well as how the mount is connected to the breadboard. Original-equipment applications have particularly stringent requirements because the setup must stay aligned even after shipment (see Fig. 1).
As a product develops from a one-of-kind laboratory system into a turnkey instrument, the requirements on the optical components that make up the system change. "The main concern for an OEM mount is to get the necessary functionality at the lowest cost," says Alan Fry of Positive Light (Los Gatos, CA), a manufacturer of ultrafast and custom solid-state laser systems. "Scientific mounts are great for R&D, but typically have much more flexibility built into them than is necessary for an OEM product."
Thus, choosing the ideal OEM mount for the final instrument is a complicated task of balancing functionality—size, ease of use, and performance—with cost. In the laboratory, for example, space is not usually an issue so large mounts are acceptable. However, in an instrument, compactness and easy accessibility to adjustment knobs become important. More-compact—and more-expensive—mounts can significantly reduce final footprint sizes. Also, more-accessible—and more-expensive—top-adjusted mounts can simplify construction, hence reducing assembly time and cost. They also simplify field service.
Indeed, picking the ideal mount is often an effective way to keep down total component costs, as well as other "hidden" costs. A more-expensive mount can reduce assembly costs, extend the overall performance and lifetime of the instrument, and minimize field maintenance visits. Understanding the long-term stability performance of optical components—both thermal and vibrational—is especially crucial because all products must withstand "survival" conditions such as rough handling by commercial shippers or hot and cold climates in airplanes, as well as the stress of routine operating conditions.
Mounting for minimal drift
In reality, minimizing drift in optical components is important whether you are an OEM or a laboratory researcher. Drift in optomechanical components changes the position of optics, affecting overall system performance. One can think of drift as a result of reversible changes in the dimensions as well as irreversible shifts in the relative positions of parts due to unrelieved stress. Shock, vibration, built-in stress, and temperature variations all cause drift. The materials, the design of the mount, the quality of the joints, the manner in which the optic is mounted, and how the mount itself is attached to the instrument all determine how much drift the setup will experience. A mount must maintain its position after undergoing large thermal changes as well as considerable vibration.
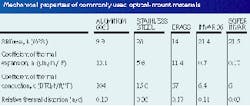
Materials. To reduce the reversible effects of shock and vibration, choose stiff materials. A stiffer material has a higher resonant frequency and will, therefore deflect less in response to a given vibration. To understand thermal effects the thermal property of a material can be characterized by the coefficient of thermal expansion, alpha, where the change in size, DL, is related to a temperature change, DeltaT, by
where L is the length of the component in that direction.
Aluminum is used for most optical applications because it is lightweight and, although it has a high coefficient of thermal expansion, it has good thermal conductivity, compared to stainless steel and Invar, two other metals used for optical mounts (see table). Aluminum parts initially may experience greater distortion than steel, but because of their ability to dissipate heat more quickly, will settle down faster. Aluminum is particularly good for applications that require fast heat dissipation because its good thermal conductivity results in lower thermal gradients that otherwise can cause distortion. For interferometric stability, stainless steel or Invar is often used because each is stiff and has a low coefficient of thermal expansion.Mount design. In order to minimize irreversible shifts leading to unwanted drift, the design of the mount is important. The bladed flexure mount, for example, has the worst thermal stability because the flexures, the most critical element in the mount, have relatively small thermal mass and are subject to changes in environmental temperature. As the flexures heat and cool, they do so nonuniformly, causing distortion. The best mounts are the two kinds based on true kinematic design principles—the "vee, cone, and flat" mount and the "three-vee" mount.
The length of each actuator or adjustment screw plays a part in mount stability. If the screws differ in length (such as in a top-actuated mount), there will be some distortion because each will expand by a different amount. Standard mirror mounts will always be more stable than top mounts because the extra motion to turn the screw through 90° will yield kinematic ambiguity and hence instability. Large amounts of grease in the actuators will also cause the threads to migrate over time and from temperature variations, leading to hysteresis as well as long-term creep.
Low-friction joints. The ideal joint for minimizing drift is one with low friction. In a low-friction joint, each ball is uniquely located in its cone, vee, or flat seat. The restoring force of the spring pulls the mount plate as far as possible into the seats where it is kinematically seated in its unique resting point. If, however, high friction conditions exist, such as when there is some roughness in the seats, the balls will not have a single and final resting point. If there is some slippage due to temperature, creep, shock, or vibration, the component will move. In this case, the component is no longer truly kinematic and will suffer from long-term instabilities. A good joint will, therefore, have a hard, low-friction material as the bearing surface for the ball. The use of either a sapphire seat or hardened steel pad as the bearing surface will ensure that repetitive adjustments do not leave tracks that make positioning non-deterministic and imprecise.
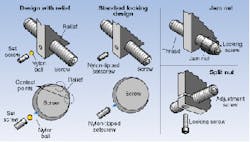
Actuator locks. These can prevent accidental adjustments by the end user as well as increase vibrational stability. There are many ways to lock actuators besides simply gluing the screw inside the bushing (see Fig. 2). The most traditional method is a simple nylon set screw that comes in from the side, pressing the screw inside the bushing. Another common method is the jam nut, in which a nut is screwed tight against the bushing, preventing motion. The main disadvantage of these two designs is that they introduce unwanted motion during the locking process.A successful design that minimizes this motion is the split nut, in which the bushing has a slit down one side. The surrounding hardware then presses down on the split bushing, applying pressure to the screw, hence locking the screw inside the bushing. Another newer design that also minimizes motion during the locking process was recently introduced by New Focus. This design is similar to the traditional nylon-tipped setscrew except that a simple relief provides a defined position where the screw finally rests, eliminating any ambiguity about where the screw is locked. Also the nylon ball rotates freely, which minimizes distortion when the screw is locked.
To glue or not
It is also important to consider how the optic is held in a high-precision mount and how the mount itself is connected to the instrument. Most scientific mounts use a single 8-32 through/tapped hole, for example, but two screws are preferable because they provide more stability and an antirotational mechanism. In addition, mounts with dowel-pin holes provide the ability to incorporate an accurate repeatable way to locate the mount. Assembly workers can then simply "drop" the mount into place onto dowel pins with repeatable accuracy.
An optic can be held in a mount by glue or by a mechanical hold. In either case, the optic must be kept as close to the kinematic mount as possible. The optic must not be cantilevered. In mounts where the mirror is held against a vee by a simple plastic-tipped setscrew, rotational forces on the mirror may twist the mirror so that it is not properly sitting in the vee seat. Nylon tips may yield under temperature changes, causing the optic to come loose or move.
For critical applications, adhesive bonding or a retainer plate with the optic positioned on three balls may be more appropriate. A retainer plate provides an indexing surface so that an optic can be mounted with some degree of repeatability and knowledge. Combining this type of mounting method with a mount that is sent to the factory in a specified position increases ease of assembly. A retainer plate also allows for easier field replacement of the optic than does epoxy, and the indexing surface ensures that the setup will not be too far off alignment.
About the Author
Sherwin D. Cabatic
Sherwin D. Cabatic is OEM project manager at Newport New Focus (Santa Clara, CA).
Kathy Li Dessau
Kathy Li Dessau is product manager at Newport New Focus (Santa Clara, CA).


