SOFTWARE & COMPUTING: Laser micromachining software attains research-friendly status
TADAS KILDUŠIS and TADAS KAZAKEVIČIUS
Software and hardware integration is critical for successful execution of diverse 2D and 3D laser micromachining tasks, including elimination of complex programming and implementation of full system automation.
Laser micromachining systems are improving on an almost daily basis as new applications emerge. Consequently, the increasing complexity and variety of control parameters for micromachining equipment has skyrocketed and led to extremely complicated machining process handling and tool programming.
Two different worlds
Scientists and engineers see the world of laser micromachining very differently. For laser systems operated in industrial facilities, the common need is to have turnkey or single-button operated systems. In this case, production engineers in industrial plants want to execute routine, programming-free tasks, where few parameters change and everything else is predetermined. For certain production activities, task-dedicated laser machines are used. They are stripped down and simplified as much as possible to reliably execute the necessary task. And although the task might seem simple from the view of the system operator, multiple devices must be automated in the background.
Alternatively, researchers (especially academic scientists in a university setting), prefer to have many programming options available when approaching a micromachining task. It is common for machine developers to receive a wish list from a university that includes up to ten different applications such as surface micro- and nanostructuring, refractive-index modification in transparent materials, ablation and engraving, milling, three-dimensional (3D) multiphoton polymerization, photo-induced etching, custom pattern scribing, and solar-cell processing (see Fig. 1).
To implement such a large collection of tasks, laser micromachining systems must be very flexible, consisting of laser sources with several harmonic generators, precise sample-positioning stages, galvanometric scanners, machine vision, micro monitoring, autofocus capability, power meters, motorized attenuators, and other peripheral equipment.
For each task, slightly or significantly different configuration and fabrication regimes are used. Moreover, the equipment must be synchronously controlled, calibrated and adjusted according to sample position and tilt, and in some cases must take into account the polarization of incident light.
The primary goal is to perform the task precisely as originally intended by the system operator and in the shortest time possible. This process usually begins by drawing some trajectories using mathematical functions or by importing otherwise designed .stl or .dxf CAD files. The software tool should interpret these drawings and convert them to trajectories of sample movement, while at the same time performing optimization calculations to reduce the machining time. Addressing all of these issues with automation software would make life easier for engineers and scientists alike.
The impossible dream?
Developers producing software packages dedicated to laser micromachining often compromise either in functionality, usability, or support of multiple types of hardware. For example, the majority of software providers offer software packages for galvanometric scanners alone, with some add-ins or separate applications to convert CAD drawings to machine code (G-code, AeroBasic) that the user must manually upload. However, only a few software providers aim for the dream combination: to develop sophisticated software tools that allow control of diverse hardware from a single interface that includes micro monitoring and trajectory optimization.
Unfortunately, a researcher wanting to use his or her equipment to its full potential more often than not must be a dedicated programmer or skillfully combine several software tools to achieve the desired laser machining process. Although the researcher might choose convenient galvo-scanner software, sample-positioning stages must still be controlled by writing machine code and uploading it to the system controllers directly. Besides taking time, the additional drawback is that data files for the machine code can become too large to be uploaded in one batch and must be split into several data packages and uploaded several times during the material processing operation.
A software solution
From our own experience in running a micromachining laboratory, our staff at Workshop of Photonics (WOP) knows the headaches that a “manual” process can cause when trying to execute numerous and varied laser micromachining tasks on one instrument. Four years ago, we began developing laser system control and automation (SCA) software. Immediately, several basic principles and challenges became clear.
Researcher-friendly laser micromachining software must eliminate or diminish complex programming, code generation, and uploading or similar time-consuming tasks that are not focused on the research itself. This is done by moving these tasks to the backend services category. In our SCA software, the operator uses a graphical user interface to input fabrication parameters and the software finds the most effective way to accomplish the task and distribute hardware device instructions accordingly; that is, linear and rotary sample-positioning stages are addressed directly to the controller’s internal library instead of using G-code. This increases software reliability as no translation from G-code to internal machine-code language is done.
Also, commands are sent only when needed so that the controller is not overloaded with huge data files and fabrication processes that might run for unlimited time periods. Therefore, the laser system may be left unattended and execute fabrication steps automatically. Historically, WOP has built its software based on high-end Aerotech (Pittsburgh, PA) controllers. Now even more control options are available.
These same automation steps must also be completed for galvanometric scanners. However, the biggest issue is to enable both positioning stages and scanners to work in the same system, or even synchronously. Software must be told or must decide which fabrication line is to be handled by which hardware. And the laser pulse density should be maintained independent of the hardware used, meaning that the laser source should be controlled from the same software.
A lack of standardized protocols—or hardware producers choosing not to support them—is a huge inconvenience for any laser software developer. To maintain full system features and control, hardware often needs to be addressed by its manufacturer protocols. This is the main reason why software tools for laser machining are usually compromised; they either support common protocols, thus enabling low-level control of more equipment, or they support individual interfaces for each device that enable full control of fewer types of equipment.
Automation software’s purpose is not only to hide different integration burdens from the end user, but also to execute precisely what is requested. That may not be possible by wandering between multiple software interfaces and having no synchronization between them. In addition, to keep the software researcher-friendly, instructions for this execution must be simple for diverse tasks. In some machining applications each laser pulse needs to be positioned very precisely according to absolute coordinates (PSO or pulse synchronized output is one of the key advantages of Aerotech’s A3200 controller series). On the other hand, some complex tasks require several hours of machining and high-level algorithms to describe the task simply and quickly so operators can accomplish fabrication through simple-to-use commands placed in a cycle.
Before machining, a complex object is designed in CAD, raster, or vector graphics software. Because describing these objects in machining code or constructing an algorithm is a difficult and time-consuming task, a final challenge for SCA machining software is to allow the importing of such files (.stl, .dxf, .plt, and .bmp, for example).
Some challenging tasks
In direct-laser-writing processes (two-photon, multiphoton polymerization, stereo lithography), 3D objects are prepared in CAD type software (SolidWorks, AutoDesk Inventor, or AutoCAD). The industry standard file format in 3D lithography is .stl, which describes surfaces of an object through a combination of triangles. Unfortunately, triangle trajectories are not suitable for machining due to inefficient movement of translation stages.
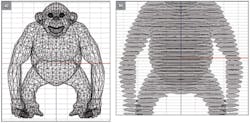
Usually in 3D laser prototyping processes, objects are fabricated layer by layer starting from bottom to top. Therefore the task of the machining software is to virtually slice the object and hatch the slices to the extent that the fabricated object would have some solid volume in the wall area—in other words, a defined wall thickness (see Fig. 2). Also, the laser spot size or “voxel” must be taken into account to avoid overlapping of fabrication lines and distortion of the overall shape of the fabricated object. To solve that, contours of the slices together with hatches must be offset at certain distances, and vertical dimensions compensated with respect to the voxel shape. To ensure structural integrity of an object, it is preferable to rotate hatching for each layer to achieve better uniformity of the solid volume. All parameters for such a fabrication process—including positioning speed, laser pulse frequency and overlapping, hatching distance and rotation, distance between layers, or even skipping of some layers—must be controlled through the software.A key software function for easy micromachining control is visualization. While neither machine code nor high-level algorithms are visual, this needs to be implemented in some other way.
In our SCA software, the “What You See Is What You Get” (WYSIWYG) window generates a preview of the fabrication pattern that is applicable for both 2D and 3D objects to be machined. The WYSIWYG functionality allows researchers to validate machining algorithms before executing machining itself.
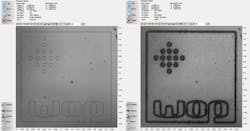
Whenever the virtual object, appearing in the WYSIWYG preview window, does not comply with requirements, certain parameters can be changed swiftly and the object is recalculated. Moreover, generated machining trajectories can be displayed super-positioned with the sample view provided by a CCD camera (see Fig. 3). Thus, fabrication trajectories or starting points can be adjusted according to sample position or some already existing marks on the object.Later, if the process is brought to pilot or mass production, this recognition function becomes very important to ensure repeatability. Machine vision would read existing markings or detect edge position of the sample and would virtually transform fabrication trajectories or reposition the sample to fabricate precisely in the area intended. This is especially useful when samples are handled automatically (solar cell or semiconductor wafers, for example) and high throughput is needed such that operator intrusion means additional delay.
Unfortunately, implementation of all the aforementioned features does not guarantee that any software package will be fully developed for all applications. It is the researcher’s nature to come up with something new, be it a new application, a new way to use existing equipment, or the adoption of new hardware. As a result, software developers as well as the software itself should be prepared for implementation of new features on demand.
Tadas Kildušis is responsible for R&D sales and Tadas Kazakevičius is chief software developer at the Workshop of Photonics, an Altechna R&D brand, Konstitucijos ave. 23B, Vilnius LT-08105, Lithuania, European Union; e-mail: [email protected]; www.wophotonics.com.


