Designing a product for manufacturability means that it can be built within budget, and there are four critical elements for optical engineers to consider when designing an optical product for manufacturability.
1. Desensitizing the design
When designing for manufacturability, it’s important to desensitize the design, and understand how a loose tolerance or misaligned lens can impact the optical performance. The cost of fabrication can increase significantly as tolerances are tightened, but most optical systems can tolerate a certain amount of deviation from the ideal design. Optical design software has a variety of tools that can help engineers reduce the cost and increase the manufacturing yield of their optical products. For example, the Monte Carlo tolerance analysis in Zemax OpticStudio can simulate the impact of all the tolerances simultaneously. The design can also contain multiple configurations that represent the best- and worst-case alignment scenarios, which can all be optimized at once to automatically desensitize the system. These configurations can account for variations in laser specifications, or for different environmental factors like temperature and pressure.
2. Conducting a full ray trace
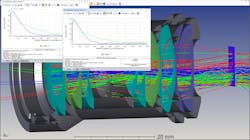
To accurately assess manufacturability and predict the optical performance of a design, it’s important to trace both sequential and non-sequential rays through the optical system. Software can simulate the effects of stray light and scattering from lens edges or mechanical components, ensure out-of-field rejection to prevent flare, or simulate the system performance with an imperfect or real source. These analyses can be computationally intensive, so it is important to look for software that focuses on performance and includes features that support productivity. For example, OpticStudio offers LightningTrace™, which allows designers to accelerate conventional non-sequential ray tracing by orders of magnitude, modifying system parameters with real-time results and quickly optimizing and tolerancing systems.
3. Presenting designs with teams
When designing for manufacturability, it’s critical to be able to visibly share designs with teams to show progress. With the improved Graphic Export feature in OpticStudio, engineers can easily share and present graphics in high resolution without loss of information. This feature enables users to quickly save layout windows with raster graphics with custom resolution (JPEG, BMP, PNG), or analysis windows with raster graphics with custom resolution (JPEG, BMP, PNG) or vector graphics (SVG). They can easily export images without any extra steps or workarounds—to use in everything from presentations to posters.
4. Using virtual prototyping to get to a high-confidence design
Most optical software packages simulate the performance of the optics in isolation, but this isn’t a comprehensive representation of how the optical components will be assessed once the product is manufactured. Instead of simulating the lenses or other optical components floating in an ideal space, a virtual prototype also includes the mechanical housing to realistically analyze the out-of-field rejection, whether enough stray light is blocked, or whether any of the mechanical components are contributing to stray light and potentially clipping the beam. This is a critical step in designing for manufacturability. Zemax Virtual Prototyping is one solution: It bridges the divide between optical design and mechanical design. LensMechanix brings the power of OpticStudio ray tracing straight to the mechanical CAD package so that mechanical, product, and systems engineers can ensure the quality of the optical performance throughout the entire design cycle.
eGuide: How to perform stray light analysis
Stray light analysis is a critical step when designing for manufacturability. Get the guide to learn how to analyze stray light in OpticStudio using the Filter string and more.


