Photonics Products: Interferometers: Numerous ways exist to interferometrically measure aspheres
Because aspheric optics—from large precision one-off designs to mass-produced small elements for consumer devices—are growing in use, the testing of aspheres is currently a very active area in optics, with improvements to the technology occurring rapidly and with impressive results. Optical testing of aspheres takes two major forms: interferometric testing and noncontact profilers (which can contain their own interferometers).
The archetypal laser interferometer—the type that has been used in optical labs for decades—is a Fizeau interferometer that uses laser light at 633 nm to measure spherical optics. For added flexibility, today's interferometers can be obtained with laser sources operating at wavelengths ranging from ultraviolet (UV) to longwave-infrared (LWIR).
Measuring aspheric surfaces or optical components on a standard laser interferometer, however, quickly becomes challenging as the asphericity of an optic increases. While weak aspheres can be measured with a standard interferometer, stronger aspheres require the use of a null lens, which is placed in the interferometer to counteract the optic's asphericity. Such a null lens often takes the form of a computer-generated hologram (CGH), a diffractive element that can be easier to fabricate than a refractive null lens. This approach is widely used.
However, null lenses do add complexity to the interferometric setup—not only do they have to be precisely made, but they have to be properly placed and aligned with respect to the interferometer and the optic under test. In response, techniques have been developed to allow testing of even strong aspheres without the use of null lenses.
In an optical profiler, a spot of laser light is scanned across the surface of an optic to determine its 3D shape point by point. In some cases, the profiler's own optical system includes a laser interferometer to characterize the spot displacement. Optical profilers are capable of measuring very steep surfaces, including hemispheres.
The Fizeau interferometric approach
Today's Fizeau interferometer is an instrument well suited for asphere surface-form characterization. For example, the Verifire Asphere (VFA), produced by Zygo (Middlefield, CT), an Ametek company, is a noncontact interferometric metrology tool based on the Verifire Fizeau interferometer that Zygo has produced for many years.
As described by Tyler Steele, product manager at Zygo, the instrument contains a five-axis motorized stage and two-axis displacement measuring interferometer (DMI) that enables automatic alignment and acquisition of an aspheric surface under test. A full 3D surface-error map and an array of numerical outputs are available to characterize surface error for final metrology or provide feedback for deterministic polishing.
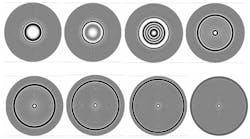
"An aspheric surface that is aligned to a Fizeau interferometer produces annular zones of null interference," says Steele. "The zone radial position is a function of Z position of the test surface relative to the interferometer. As the test part is translated in Z with feedback from the DMI, zones are acquired across the test surface (see Fig. 1) and the aspheric surface is reconstructed in software. The output is a deviation from the ideal design, or an optimized asphere base radius and conic constant can be calculated from the as-measured best fit surface."
The VFA is best suited for rotationally symmetric aspheres with departure from spherical of less than 800 μm and radius of curvature less than 800 mm, notes Steele. "The ophthalmic market has benefited from this metrology technique, as contact lens surfaces fit within these conditions," he says. "Many new contact-lens designs are based on aspheric surfaces that slightly deviate from spherical in order to achieve multifocal effects. Accurate metrology of these designs is critical in ensuring the proper prescription, as well as defect inspection and process management."
Large-volume manufacturing areas such as the contact-lens market have driven the development of an automation capability for the VFA: a 150 × 150 mm stage and automation software enable multiple test parts to be placed in a tray and automatically measured. Relevant results and a surface-error map are reported, with a graphical pass/fail interface controlled by an operator. In addition to asphere metrology, the VFA is capable of precision spherical radius and surface measurements, as well as toric surfaces—each a key surface shape in the ophthalmic contact-lens industry, says Steele.
One way to allow a Fizeau interferometer to measure strong aspheres without resulting in an unmeasurably high number of fringes is to divide the full aperture into subapertures, measure each one, and combine the data. This approach, developed at QED Technologies (Rochester, NY) and termed subaperture stitching interferometry (SSI), is a mainstay of the company's interferometer systems.
"Our systems combine a precision motion platform, interferometer, novel stitching algorithms, and custom software," says Paul Murphy, senior optical engineer at QED. "SSI technology enables testing spheres of large size (150–400 mm convex lenses) and high-numerical-aperture (hemispherical) optics that have traditionally challenged conventional full-aperture interferometry. Finally, SSI technology makes aspheric measurement possible without dedicated null lenses."
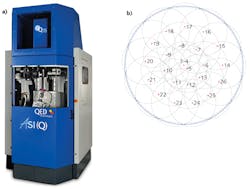
The Aspheric Stitching Interferometer with QIS [ASI(Q)] is the latest offering from QED, notes Murphy. The QIS, a coherent imaging, 6-in.-aperture Fizeau interferometer, is mounted in a multiaxis machine. The user enters information on the part and the software automatically recommends a transmission element, designs an appropriate subaperture layout (lattice), and collects and stitches the subaperture data (see Fig. 2)."The QIS allows for greater than 50% more slope capture than a conventional, incoherent system," explains Murphy. "This is critical for asphere measurement, as many prescriptions have large slopes (many fringes) over any given subaperture. The ASI(Q) also can be configured with the optional variable optical null (VON). The VON corrects for known amounts of coma and astigmatism for any given subaperture, allowing for data capture in subapertures that would otherwise have fringe densities too high for reliable interferometric acquisition. Achievable measurement specifications are part- and environment-dependent, but QED has demonstrated results in the single-nanometer range."
The ASI can handle steep surfaces; in one example by Murphy (which happens to be for a sphere rather than for an asphere), a 150-mm-diameter lens with an approximately 500 mm radius was measured and polished. "A 6 in. interferometer cannot cover a convex part of these dimensions, says Murphy. "For a concave part, an f/3 or faster transmission sphere is needed to cover the part without stitching. With stitching, however, we were able to employ a slower diverging transmission sphere to obtain higher magnification and thus superior lateral resolution. Furthermore, we took advantage of the ASI's automatic random reference calibration to enable mid-spatial-frequency measurements at tenth-nanometer levels. These measurements allowed magnetorheological finishing (MRF) corrections to improve the surface form and mid-frequencies to better than 1 nm root-mean-squared (RMS), as well as monitor submillimeter lateral features."
Surface profiling by scanning
Measuring the surface of an asphere by scanning an optical spot across it in a predetermined pattern is another important noncontact technique (contact profilometry, which is yet another important technique, will not be covered in this article).
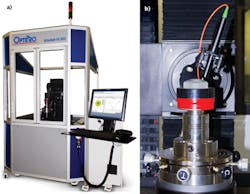
The UltraSurf noncontact metrology system, made by OptiPro Systems (Ontario, NY), uses focused light from an optical probe to scan aspheric surfaces for 2D and 3D surface figure error analysis for either ground or polished optical surfaces (see Fig. 3). Noncontact point sensors can include a low-coherence interferometer to measure inside and outside surfaces at the same time, or a white light confocal system to measure individual optical surfaces."The UltraSurf 4X 300 has the capability to measure virtually any asphere up to 300 mm in diameter," says Ed Fess, R&D manager at OptiPro. "The 4X 300 model number denotes four axes of motion (X, Z, B, and C) with 300 mm of X-axis travel. To achieve high-precision metrology, all axes are driven by the latest air-bearing and linear-motor technology. Each linear axis has nanometer resolution, while both rotary axes have subarcsecond resolution. In addition, the UltraSurf 4X 300 can accommodate a variety of probes operating at different wavelengths."
Fess notes that the unit's flexibility in both travel and probe compatibility makes it ideal for measuring large aspheric surfaces as well as aspheres with radical departure. "The UltraSurf is also capable of measuring both surfaces of near-meniscus shapes simultaneously," he adds. "In this case, it can measure the convex, concave, and thickness maps in one measurement scan. The thickness map can provide a detailed 3D map of any wedge and decenter that might be between the two surfaces."
Fess gives two example applications in which the UltraSurf's capabilities helped in a manufacturing process. The first involved a customer who was manufacturing an asphere with aspheric departure on the order of 1000 waves. "The customer had an issue during their manufacturing process that caused the form error of the optic to exceed what they could measure with their interferometer and hologram setup," says Fess. "We were able to use the UltraSurf to measure the optic and provide them with a data map to use with their subaperture polishing process. This allowed them to correct the surface shape and utilize their process again. We also had a customer purchase an UltraSurf for the simple fact that it was not slope-limited like contact profilometers, and was not limited to how aspheric the profile was."
Zygo has developed and commercialized a 3D surface mapping system, called the Compass, that is specifically designed to inspect small aspheres typically used in consumer electronics devices. Eric Felkel, product manager at Zygo, says the Compass asphere metrology tool uses both coherence scanning interferometry (CSI) and 2D vision analysis to make subnanometer 3D measurements of optical surfaces, as well as 2D inspection of relevant mounting and alignment parameters of both lenses and injection-molding tooling molds.
"The technique is entirely noncontact and results in 3D topography, deviation, and texture results," he says. "Users can create recipes that automate the process of characterizing the entire lens. The noncontact CSI technology leverages the short coherence length of white-light illumination to compare the surface of a test region to a reference surface built into the microscope objective. Overlapping regions of the surface are measured and then stitched together to form a full 3D map of the lens topography. The 3D map can then be compared to the optical prescription and a deviation map can be presented, showing both qualitatively and quantitatively how different the optical element is from the design parameters."
The noncontact measurement is important, notes Felkel. "While small plastic lenses can be made in sufficient volumes to be expendable for metrology, the precise molds used to manufacture them require significantly more care," he explains. "A noncontact solution allows a finished lens mold to be measured and immediately used, without a final finishing step to remove evidence of metrology. In addition, because Compass measures the entire surface of the asphere, it can detect problems that may escape notice of other techniques."
For example, one issue uncovered by an inspection with the Compass tool was that a customer's plastic injection process was actually underfilling the lens mold, resulting in an asymmetric lens surface as well as an incorrect surface shape. Line-profiling-based techniques could see the incorrect surface shape, but it wasn't until the lens was measured with the Compass that the underfill became obvious.
Multiwavelength interferometry
A scanning-interferometer-based asphere-measurement system produced by Taylor Hobson (Leicester, East Midlands, England), another Ametek company, is based on multiwavelength interferometry (MWLI), which has the capability of measuring absolute distances. As noted by Erik Stover, business development manager at Taylor Hobson, the LuphoScan system contains a four-wavelength probe.
The system contains a fiber-based interferometer with four wavelengths that lie in the 1530–1610 nm range, with all light coincident at the same point on the test optic. The resulting four independently measured interference signals are digitized and their information combined to produce an absolute distance measurement. The optic under test is scanned by rotating it on a 360° rotary stage while moving the interferometer probe radially and in Z.
The absolute-measurement capability allows the system to correlate data measured successively on different surfaces, such as the front and back of a lens, enabling the system to determine decenter, wedge, lens thickness, and lens-mount positioning as well as asphere surface shape.
For More Information
Companies mentioned in this article include:
OptiPro Systems
Ontario, NY
www.optipro.com
QED Technologies
Rochester, NY
www.qedmrf.com
Taylor Hobson
Leicester, East Midlands, England
www.taylor-hobson.com
Zygo
Middlefield, CT
www.zygo.com
For a complete listing of companies making interferometers, visit the Laser Focus World Buyers Guide (https://www.laserfocusworld.com/directory).

John Wallace | Senior Technical Editor (1998-2022)
John Wallace was with Laser Focus World for nearly 25 years, retiring in late June 2022. He obtained a bachelor's degree in mechanical engineering and physics at Rutgers University and a master's in optical engineering at the University of Rochester. Before becoming an editor, John worked as an engineer at RCA, Exxon, Eastman Kodak, and GCA Corporation.


